Drilling into stucco is something every house in the GTA has had done to it — for a light, a camera, a hose reel, a dryer vent. In 25+ years on the tools I have opened up a lot of wet walls, and the wet part is almost never in the middle of a panel. It is at one of those holes, covered with a smear of caulk years ago and forgotten about.
None of this is an argument against putting things on your wall. Houses need lights, cameras and air conditioning. It is an argument for treating every hole as part of the wall assembly, because a $6 screw in the wrong place is how a repair bill starts.
Can you drill into a stucco wall?
Yes, and it happens on every house in the GTA — lights, cameras, vents, house numbers, hose reels. A hole by itself does no harm; a hole with nothing sealing it behind the finish is how water gets into the wall. Every fastener asks two questions: what carries the load, and how does water get back out.
Almost every failure I get called to answered one of those questions and ignored the other: a heavy bracket lagged solidly into a stud with the hole left open at the top, or a doorbell camera sealed beautifully and hanging off two plastic anchors set in foam. Opposite mistakes, same wet wall.
What actually holds a fastener in stucco or EIFS?
Not the finish. Traditional hard-coat stucco is roughly 15–20 mm of cement over lath, which will grip an anchor for something light. EIFS has foam directly under its thin finish, and foam holds nothing at all. Anything heavier than a house number has to reach the framing or the structural sheathing behind the system.
| What you are mounting | What the fixing has to reach | How it should be done |
|---|
| House numbers, small plaque | The finish coat is enough | Short stainless screw in an anchor, hole sealed, head sealed |
| Light fixture, doorbell camera, outlet | Sheathing or blocking | Mounting block bedded in sealant, screwed back to solid material |
| Hose reel, flag bracket, planter arm | Framing — no exceptions | Lag bolts into a stud through oversize, sealed holes |
| TV bracket, awning, EV charger, heat-pump bracket | Framing or added blocking | Planned before the finish goes on where possible |
| Deck ledger, railing post, stair stringer | The house structure itself | Not a mounting job — a flashed structural detail |
There is a five-second test for which system you have: knock on the wall with a knuckle. Hard-coat answers solid, like a sidewalk. EIFS answers hollow and slightly soft — that is the foam. Worth knowing before you buy anchors, though it changes nothing about the sealing: both need the same detail.
Leverage is what catches people out, not weight. A hose reel weighs maybe 4 kg empty and three times that with wet hose on it, and it hangs a good 25 cm off the wall, so every tug on the hose multiplies the pull on the top fasteners. In foam the screw does not shear — it slowly reams its own hole into an oval. The fixing moves, the seal around it tears, and the finish cracks in a ring around the bracket.
Why does a hole in stucco leak even when it looks sealed?
Because the bead of sealant outside is usually the only thing doing the job, and it sits where the sun and the freeze-thaw are. Caulk smeared over a screw head is a two-to-three-year part. Behind it the hole still runs through the finish, the base coat and the water barrier into a cavity with no way to drain.
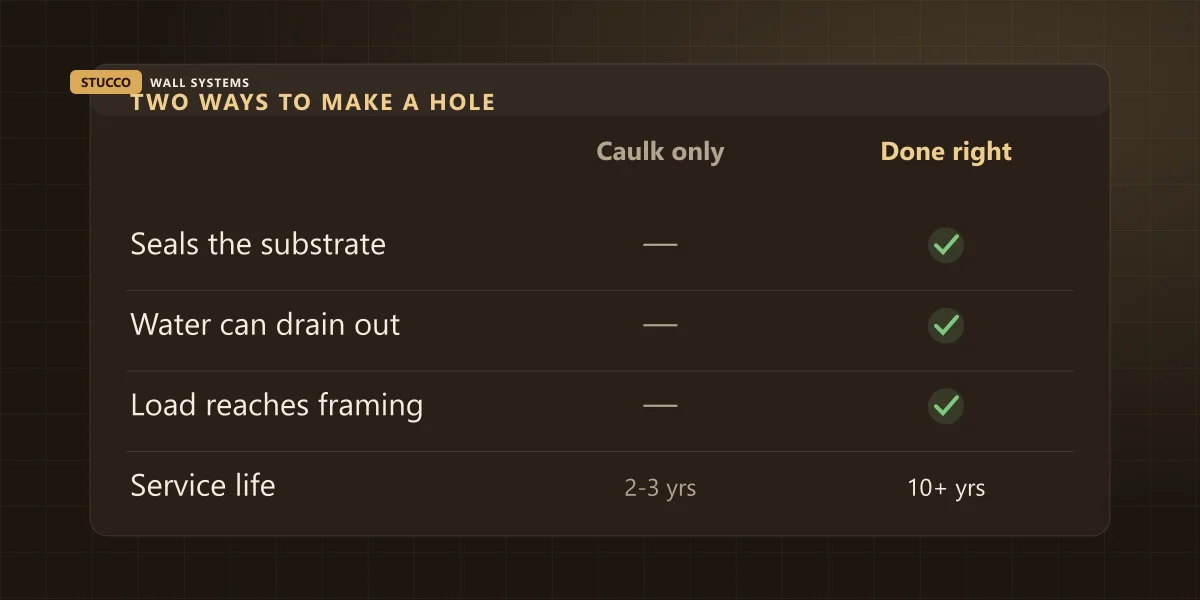
A stucco or EIFS wall is not designed to be perfectly watertight. It is built to shed most of the water and drain the rest back out at the bottom, which is why flashing and the weep detail matter so much — I go through that whole system in flashing, explained for homeowners. A drilled hole quietly cancels that design in one spot. Water that gets past the surface at a fastener sits behind the drainage plane instead of in front of it, and the wall has no route for it.
Water also enters at the top edge of a fixture, not the bottom. Anything with a flat top — a light, a junction box, a bracket plate, a vent hood set dead level — is a shelf. Rain lands on it, runs to the back, and finds the gap between the plate and the wall. That is why the stain you see is a tear running down from underneath something: the entry point is above where the stain starts, not at it.
Then winter finishes the job. Water sitting in a fastener hole freezes and expands, with nowhere to go except outward against a brittle finish. The fine ring of hairline cracking around an old light fixture or an abandoned satellite bracket is not the finish wearing out — that is a hole that has been full of water for a few winters.
| Where water gets in | What you see on the wall | How urgent |
|---|
| Top edge of a flat-topped fixture | A tea-coloured tear running down from under it | Fix this season |
| Screw head with caulk over the top | Ring of hairline cracks, sometimes a rust streak | Fix this season |
| Abandoned holes from removed fittings | Small open holes, often plugged with foam | Before winter — an open hole is a funnel |
| Lineset or vent sleeve, no hood, no fall | Staining below the collar, finish soft to the thumb | Now — that is water in the substrate |
How do you seal a penetration in stucco properly?
Find the framing first, drill the hole oversize so the fastener never bears on a brittle finish, seal at the water barrier rather than on the surface, and mount the fixture on a block that stands proud of the wall. Do those four things and the sealant is only handling the last small part of the job.
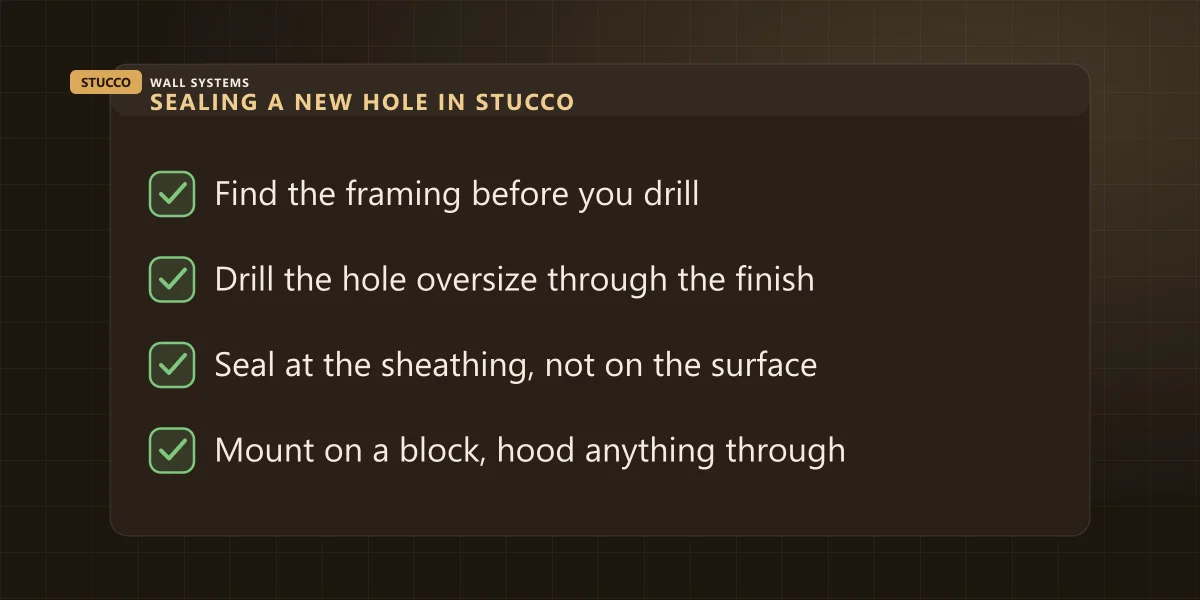
Locate before you drill. A stud finder is close to useless over metal lath, and not much better through a layer of foam. Measure from a corner or a window edge instead, where framing is predictable, and treat a small pilot hole as a question, not a commitment. And know what else lives in that wall: air-conditioning linesets, low-voltage runs and sprinkler lines are all in there somewhere, and none of them announce themselves.
Drill oversize through the finish. A 6 mm fastener wants roughly a 10 mm hole through the finish and foam, then its proper pilot in the wood behind. That sounds backwards until you picture what a tight hole does: the screw clamps onto a brittle coating that expands and contracts all year, and the coating loses. The oversize ring is also the space you fill.
Seal at the barrier, not on the surface. Sealant goes down into the hole against the sheathing, so the water barrier is closed where it was opened. A bead applied over the top afterwards is a cosmetic second line, not the seal. Where a gap is wide, backer rod goes in first so the sealant has the right depth-to-width ratio and can actually stretch — the same rule that governs every joint we renew on the caulking side of the business.
Mount on a block. A pre-finished mounting block, or a piece of trim bedded in sealant and screwed to solid material, gives you a flat sealed surface standing off the wall face. It sheds water at its own top edge, it keeps the fixture off a textured finish that was never flat, and when the fixture gets replaced nobody has to touch the wall. This is how exterior lights should have gone on in the first place. On new work we build the blocks in before the finish coat: minutes then, a repair later.
Give the water a way off. Anything passing right through the wall — a lineset, a dryer vent, a bathroom exhaust — gets its hole drilled with a slight fall to the outside and a hood or collar over it. A dead-level hole is a straw. Then put it on the calendar: sealant at penetration collars is roughly a ten-year renewal item, the shortest service life of any joint on the house.
What should never be screwed straight to a stucco wall?
Anything structural or heavily loaded: deck ledgers, railing posts, stair stringers, carport beams and large awnings. A stucco system is cladding, not structure, and it sits directly in front of the layers keeping the wall dry. Those loads belong on the house frame, with a flashed detail designed for them from the start.
The deck ledger is the one I would put a sign on. It carries people, it pulls the top of the board away from the wall every time somebody walks on the deck, and it needs metal flashing above it so rain running down the wall goes over the board instead of behind it. Running stucco past a ledger and trusting caulk at the junction is how you get rot where nobody can inspect it. It is also permit territory in most GTA municipalities — Toronto sets out when a building permit applies on toronto.ca, and decks are on that list.
The same logic covers the modern additions. A mini-split bracket, an EV charger, a heat-pump lineset, a floodlight on an extended arm — all routine, and every one a penetration with weight on it. If you are having a wall re-clad and you know a charger is coming next year, tell me while the scaffold is still up. A block built into the system costs minutes at that stage. Retrofitting one into a finished wall is a stucco repair with a colour match attached.
What about the holes already in your wall?
Count them. Every house has holes nobody owns: the bracket from a satellite dish that stopped being used a decade ago, an alarm bell, a removed light, an old dryer vent, four anchors from a hose reel that moved house with the previous owner. Abandoned penetrations are the most common water route I find on otherwise healthy walls.
Checking them takes fifteen minutes and no tools. Walk each elevation and look under anything fixed to the wall for a tea-coloured tear stain, or a darker patch still there after two clear days. Then press the finish just below it with your thumb. Firm is fine. Any give at all, stop pressing and get it looked at — a soft finish means the substrate is already wet, and the full list of tells is in six signs water is behind your stucco.
One thing I would ask you not to do: do not plug an old hole with expanding foam. It looks finished, costs nothing, and holds water against the sheathing like a sponge for the next five years. An abandoned hole gets cut back to sound material, rebuilt through the layers with mesh, and refinished — and the finish gets broken at a control joint or a corner so the patch does not read as a patch, which is the whole subject of why stucco repairs show.
What does it cost to fix a leaking penetration?
Caught at the stain stage it is a few hundred dollars of sealant and refinishing. Renewing the sealant at every penetration on a house sits inside a whole-home caulking renewal at $800–$2,500. After a couple of winters of water behind the wall you are into $1,500–$5,000+, because the price follows the wet substrate rather than the stain.
| The work | Typical range | When it is worth doing |
|---|
| Whole-home sealant renewal, penetrations included | $800–$2,500 | At 10–15 years, before anything stains |
| Failed sealant and collars at fixtures | $500–$1,500 | As soon as a bead splits or pulls away |
| Cut out and rebuild an abandoned hole | $400–$1,200 | Before winter — an open hole is a funnel |
| Hairline cracking around a fixing, finish sound | $300–$800 | Plan it into the next recoat window |
| Wet substrate behind a penetration | $1,500–$5,000+ | Now — the price follows the water |
Read the top row and the bottom row together, because that is the actual decision: the cheapest line is work done on a wall that looks perfectly fine, and the most expensive is that same house four winters later. Sealant is the least glamorous money you will ever spend on a building and the best-performing.
Should I drill it myself, or get a contractor to do it?
Light and low — house numbers, a doorbell, a small plaque — most homeowners can do properly with an oversize hole, a stainless screw and sealant in the hole rather than over it. Anything carrying weight, anything passing right through the wall, and anything above the first storey is worth handing to somebody with a ladder and a warranty.
The more useful move costs nothing at all: tell whoever is drilling. The camera installer, the HVAC crew, the alarm technician, the electrician fitting a charger — most will detail it properly if you say the words “this wall is EIFS, please mount on a block and seal the hole at the sheathing”. Almost none will volunteer it, because on brick or vinyl it matters far less. Two sentences in the driveway is the cheapest wall protection in this article.
A wall carrying ten years of other people’s holes is normal, not a disaster. We sort these out across Oakville, Mississauga and the rest of the GTA, and the finished work is in our project portfolio. Send me the address and a couple of photos of whatever is fixed to your wall, and I will tell you honestly whether it needs anything at all — in writing, for free.