Somebody is coming to replace your windows, and replacing windows in a stucco house is not the same job it is on a brick or a siding house. On brick, the window comes out of an opening and the brick stays where it is. On stucco, the finish very often runs over the edge of the window itself — so the window cannot come out until part of the wall comes off. That work is real, it costs money, and in most of the quotes I get shown, nobody has priced it.
I have been finishing walls across the GTA for over 25 years, and I get two versions of this phone call. The first one comes in March, before anything is booked: “we are getting the windows done, does that affect the stucco?” That call takes ten minutes and usually saves a couple of thousand dollars. The second version comes the following November: a dark band under a sill, a fat bead of sealant doing structural work, and a window company that finished the job six months ago and has moved on. This guide is written so you make the first call.
Does replacing windows damage stucco?
Only if the windows come out full-frame, and then it is not damage — it is demolition you agreed to. A retrofit insert fits inside the old frame and never touches the wall. A full-frame replacement takes everything back to the rough framing, which on most stucco houses means cutting the finish back three to four inches around every opening on the house.
So the wall is not a victim in any of this. It is a cost you have to budget for, and the trouble starts when nobody writes it into a scope, because the window installer's scope ends at the window and my scope starts at the wall, and the three or four inches in between belong to whoever arrives there last holding a tube of sealant. I wrote separately about why stucco cracks around windows before anywhere else; this post is about the day the window actually comes out.
Retrofit or full-frame: which one does a stucco wall want?
Retrofit, if your existing frames are dry, square and sound, and you can accept a little less glass. Full-frame, if the frames are rotted, the openings already leak, there is no sill pan behind them, or you are re-cladding the house anyway. On a stucco house the condition of the wall carries as much weight in that decision as the condition of the window.
Window companies will usually offer you both and describe the difference in terms of the window: better seal, better frame, cleaner look. All true. But on a stucco wall the difference is mostly about what has to be cut, and that is not on their side of the fence.
| What changes | Retrofit insert | Full-frame replacement |
|---|
| The wall | Untouched. Nothing is cut, nothing is patched, nothing needs matching | Cut back three to four inches all the way round, then rebuilt and matched |
| The glass | You lose the width of the old frame on all four sides — typically an inch or so each way | Unchanged, or slightly larger, because the new frame sits where the old one did |
| The sill pan | Whatever is back there stays back there. If it was never installed, it is still never installed | Can finally be installed properly, sloped out, with end dams |
| The water barrier | Not re-established. The old lap order is the lap order you keep | Re-lapped onto the sheathing, which is the whole point of doing it this way |
| The wall-side cost | Nothing, because nothing was opened | A real number, and one that is almost never on the window quote |
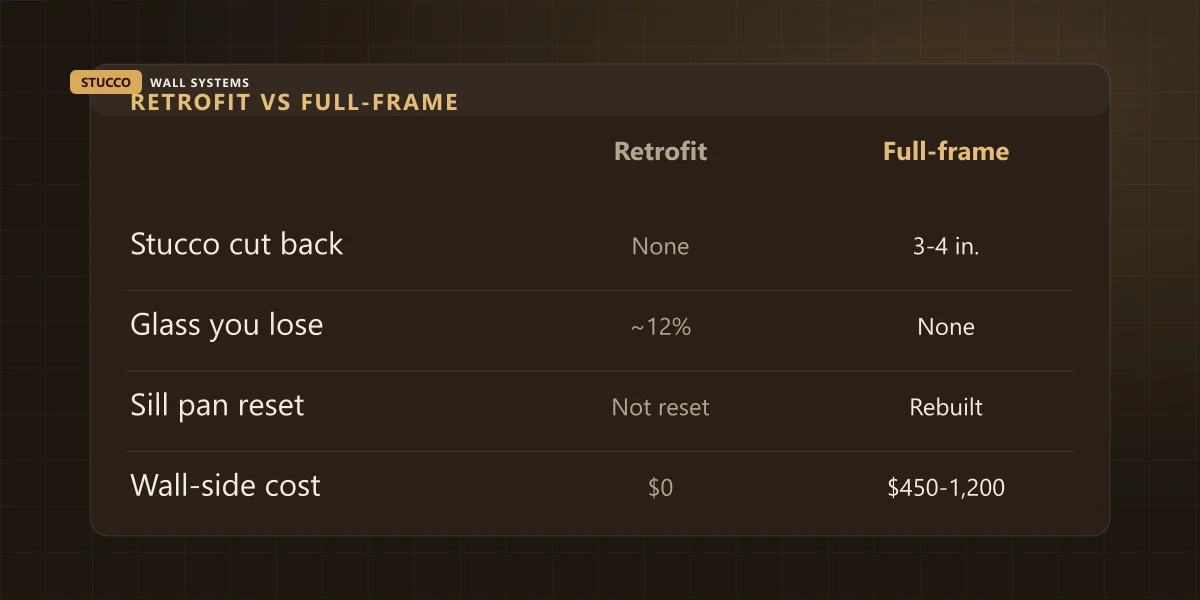
Read that table twice, because the two rows people skip are the two that matter in five years. A retrofit is genuinely the cheaper, cleaner, faster job — and it is also the one that leaves every existing water problem exactly where it was. If your window is being replaced because the corner is staining, a retrofit puts a beautiful new window in front of the leak.
What a retrofit actually costs you in glass
Roughly an inch to an inch and a quarter of frame on every side, which sounds trivial and is not. On a 36 by 48 inch daylight opening, losing an inch and a quarter each way takes you to about 33.5 by 45.5 inches. That is twelve square feet of glass down to a shade over ten and a half — about a twelve per cent cut in daylight, on a window you are paying to improve.
It matters most where you notice light: basements, north walls, and the small bedroom window that was already tight. It matters least on a big picture window where an inch of extra frame disappears into the sightline. Nobody tells homeowners this arithmetic because it argues against the easier sale, and I would rather you do the multiplication at the kitchen table than notice it in February.
The other retrofit trade-off is that you now have two frames stacked in one opening, and the outer one is the old one. If that old frame is a 1970s aluminum unit with a rotting wood sub-sill, you have wrapped a thirty-year problem in a twenty-five-year warranty.
What is behind the stucco at your window?
One of four things, and which one you have decides whether a full-frame job is a clean cut or an argument: a wood buck with exterior trim, a buck with a metal casing bead, a nailing fin buried under the finish, or an EIFS return. You can usually tell from the driveway by looking at how the stucco meets the frame.
Age of the house is the quickest guide. On the older stock through Etobicoke and The Kingsway you are generally looking at a buck and trim. Through the 1970s and 1980s side-splits in Mississauga and Scarborough, a casing bead. On anything built from the 1990s on — Erin Mills, most of Vaughan, the newer Kleinburg pockets — assume a nailing fin until somebody proves otherwise.
| Roughly when the wall was built | How the window is held in | What taking it out means |
|---|
| Pre-1960s, three-coat over wood lath or wire | A wood buck with exterior wood trim, and the stucco butts into that trim | Sometimes the sash comes out without touching the field, but the perimeter still opens. The old paper behind is brittle and rarely survives |
| 1960s to 1980s, wire lath over paper and sheathing | A wood buck or early aluminum frame, with the stucco stopped at a metal casing bead | The neatest cut of the four, because the bead gives a clean edge. Expect the sheathing behind the sill to be the surprise |
| 1990s onward hard-coat over sheathing | An integral nailing fin nailed through the barrier, with the finish run over it | There is no no-cutting option. The fin is behind the finish, so the finish comes off to reach it |
| EIFS, any era | The window is set against the sheathing and the foam and mesh are returned into the opening | The returns come off with the window. Rebuilding them is foam, backwrap, mesh, base and finish — not a patch |
Here is the ground-level version. If the stucco meets the frame at a crisp straight line with a thin metal edge visible, you have a casing bead and a buck. If it dies softly into a fat bead of sealant with no metal anywhere, the finish was almost certainly run over a nailing fin. And if the window sits at the bottom of a reveal deep enough to rest your hand in, that is EIFS, and it is a different job with a different price.
What does the wall side of a full-frame job cost?
On a sound wall, the stucco work around a full-frame window job is a repair visit, not a re-clad. Our published stucco repair rates cover it: $120 to $400 for minor localised work, $450 to $1,200 for a moderate repair, and $18 to $34 per square foot for detail work over an opened area. Wet sheathing found behind a sill moves it into the $1,500 to $5,000 band.
Now the arithmetic that shows why a per-square-foot rate is the wrong tool here. Take a house with eight openings, average four feet by four and a half, cut back four inches all round. Each perimeter is about seventeen linear feet, and a four-inch band on seventeen feet is roughly five and a half square feet. Eight of them is about 45 square feet. At $18 to $34 that is $810 to $1,530.
The arithmetic is right and the number is close to meaningless, because nothing about that job is priced by area. It is priced by the visit: getting a crew and a mixer to your house, working around whatever access the elevations need, and coming back after the base coat has had its cure window before anybody touches the finish. Forty-five square feet spread over eight separate openings on four elevations is a completely different animal from forty-five square feet in one square patch.
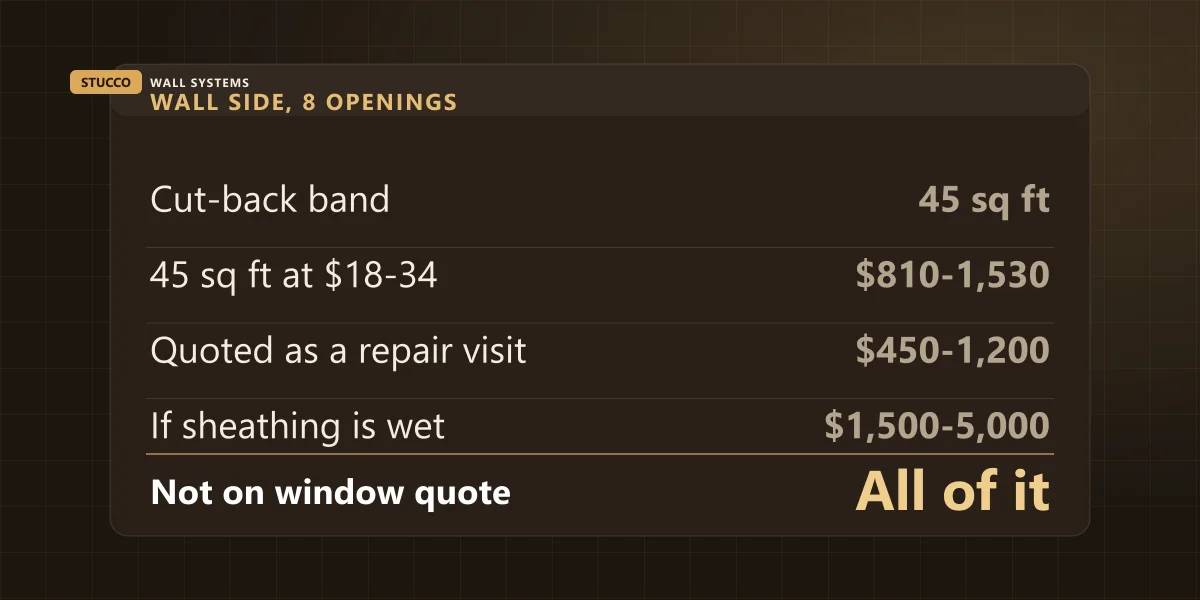
Which is why I quote it as a repair visit and not as a rate, and why the number in front of you should be a scope with a price on it rather than a square-foot figure that sounds precise. The one thing I will promise is that it is not zero, and it is not on the window quote.
The details that decide whether it leaks
Four of them, in the order water finds them. None are expensive while the wall is open, and all four are expensive once it is closed.
| The detail | Done properly | What I usually find instead |
|---|
| The sill pan | A pan under the window, sloped out, with end dams turned up at both sides, lapped over the barrier below | Nothing at all, or a strip of membrane laid flat, which holds water instead of shedding it |
| The jamb and head laps | Barrier lapped over the fin at the jambs, and the barrier above lapped over the head flashing | Membrane taped over everything in whatever order was quickest, so the head lap points water inward |
| The new mesh | Lapped past the cut edge onto sound existing reinforcement, never butted to it | Butted at the saw line, which telegraphs a rectangle around every window within two winters |
| The perimeter sealant | A joint over backer rod on two sides, with the sill drainage path left open | A bead smeared over the cut edge on all four sides, sealing the one path water had to get back out |
That last row is the one that turns a window job into a stucco repair. Sealing all four sides looks like thoroughness and behaves like a bathtub. It also has nothing to do with sealant quality — good caulking and joint work is about where the bead goes and what it is allowed to move against, not about the tube it came out of. And on the mesh row, the reason a butted patch shows is exactly the reason set out in why stucco repairs telegraph: a patch has to be tied into the wall, not laid against it.
The order that saves the most money
Windows first, wall second. Always. If you are within a few years of re-cladding, doing the windows first means every perimeter detail on the house gets built into the new wall at no extra cost, because the crew is already there, the barrier is already open and the finish is new everywhere so there is nothing to match.
| The order you choose | What it costs you |
|---|
| Windows now, re-clad in the same season | The best case. One mobilisation, one set of access, and the perimeter detail sits inside the $8 to $16 per square foot of a residential re-clad |
| Windows now, wall staying as it is | A repair visit around the openings, quoted as a scope. Fine — just make sure it is on paper before the first window comes out |
| Re-clad now, windows in a year or two | The expensive one. You will be cutting a wall that is a year old, and colour matching a cured finish against a wall that has weathered one season |
| Re-clad now, windows never | Perfectly reasonable, as long as the crew details the existing openings properly on the way past rather than finishing up to them |
I lose work by telling people this, because the honest advice is often “get the windows quoted first and call me after.” But a re-clad that gets cut open eighteen months later is a bad outcome for both of us, and it is the single most avoidable mistake in this whole subject. The same logic applies to anything else that has to penetrate the wall — a heat pump line set, a deck ledger, an exterior tap. The wall is only open once.
When does a window replacement need a permit?
In Toronto, a like-for-like replacement in a house does not need one. The City lists replacing a window or door in an existing opening as permit-exempt, on three conditions: there is no change to the location or size of the opening, the structural support for the opening is not altered or affected, and no new exit is created.
Change any of that and you are in permit territory. The City's list of work that does need a permit includes “new windows or doors where there were none before” and “enlarging or relocating existing windows or doors” — you can read both lists on the City of Toronto's when do I need a building permit page. Other GTA municipalities publish their own version, but the principle is consistent: the opening, not the window, is what the Building Code cares about.
For my trade the practical consequence is simple. Widening an opening by even six inches turns a window replacement into a framing job with a new lintel, and the stucco around it stops being a perimeter repair and becomes a rebuilt section of wall with a new control joint layout to think about. If somebody is proposing to “just make it a bit bigger while we are here,” that is a different quote and a different conversation.
What to have written down before the first window comes out
Not a long list. Four things, and they cost nothing to add in advance.
Who cuts the stucco back, and how far. Who supplies and installs the sill pan and the head flashing, by name, not by implication. Who rebuilds the finish, and whether the price includes coming back for the finish coat after the base has cured. And what happens if the sheathing behind an opening turns out to be wet — which should be a written change order, not a number agreed on the driveway on a Friday afternoon.
If your window company can answer all four, take their answer. If they cannot, that is not a reason to distrust them — it genuinely is not their trade — it is a reason to get the wall side quoted separately before anybody starts cutting.
The short version
A retrofit costs you glass and keeps your wall. A full-frame costs you wall and gives you the chance to fix everything behind the opening that has been quietly wrong since the house was built. Neither is the right answer for everybody, but on a stucco house the deciding factor is usually not the window at all — it is whether there is a proper sill pan back there, and there is only one way to find out.
We do window perimeters, openings and full elevations across the GTA, from Toronto and Mississauga out through Oakville and Vaughan. Perimeter work sits under stucco repair, a full re-clad is set out under residential stucco, and there are finished openings and returns in the project gallery. If you have window quotes in hand and want to know what they mean for the wall, send us the address and a photo of one opening or call (905) 973-6470 — that is the ten-minute call, and it is the cheapest one in this whole guide.