If you send me a photo of a crack in your wall, I can usually tell you where it is before I open the file. It starts at the corner of a window and runs off at an angle, up and away from the frame. In twenty-five years I have looked at a lot of them, and here is the part that surprises people: stucco cracks around windows almost never because of the stucco. That corner is where the wall was interrupted, and an interruption is where both movement and water end up.
Why does stucco crack around windows first?
Because two unrelated forces arrive at the same four points. A window is a rectangular hole cut in a continuous wall, so movement travelling through that wall has to route around the hole and concentrates at its corners. Separately, every drop of rain running down the elevation above reaches the top of the opening. Corners take the stress, the perimeter takes the water.
Take the movement half first, because it is the one nobody explains. Your base coat is a thin cementitious skin, and the only thing giving it tensile strength is the mesh embedded in it. Mesh works like rebar: it carries tension across a line that wants to open. On the open field of a wall the sheets run square — strands going up and across — and that is exactly right, because that is the direction the field wants to move.
Now look at a corner. The line a corner crack wants to follow runs at roughly forty-five degrees, diagonally out from the corner. Square mesh has nothing crossing that line. Its strands run parallel to it and perpendicular to it, and neither of those carries a thing. So unless somebody put a separate diagonal patch across each corner before the base coat went on, the crack has a clear run.
The second half is temperature. A vinyl or aluminium window frame moves at a different rate than the wall it sits in, and on a west-facing wall in Bronte taking full afternoon sun off the lake, that differential runs every single day of the summer. The joint between the frame and the wall is the expansion joint absorbing it, which is why sealant there is a wear item with a service life of roughly five to ten years and not a permanent part of the building.
What does the direction of the crack tell you?
More than the width does. A crack running diagonally out of a corner is a reinforcement story. One running vertically up a jamb is usually a missing control joint. A horizontal crack across the head points at the header or at the head detail holding water. Fine cracking spread over the whole area is a finish-coat issue and has nothing to do with the opening.
| What you see at the opening | What it usually means | What it needs |
|---|
| An angled crack running up and out of a corner | Stress concentrating at the corner with no diagonal reinforcement behind it | Open it, reinforce it, rebuild — sealant will reopen |
| A vertical crack up the side of the opening | Movement at the jamb, often no control joint anywhere near it | Assessment first; the joint may have to be cut in |
| A horizontal crack along the head | The header above is moving, or the head detail is holding water | Check the flashing above before touching the finish |
| Fine map cracking across the whole area | A finish coat or curing issue, unrelated to the opening | Cosmetic — deal with it when the wall gets refinished |
| A stair-step crack running straight past the opening | Substrate or structural movement using the opening as the weak line | A structural read before any stucco work at all |
One more thing worth counting before you call anybody: how many windows are doing it. A single cracked corner on one window is local — that opening moved, or something is wet there. The same angled crack at the same corner of four windows down one elevation is systemic, meaning the corner detail was skipped across the whole job. Those are two different conversations and two very different quotes. If you want the wider version of this — every crack pattern on a wall and what our winters do to them, not just the ones at openings — that is why stucco cracks in GTA winters.
What is corner reinforcement, and why does it prevent this?
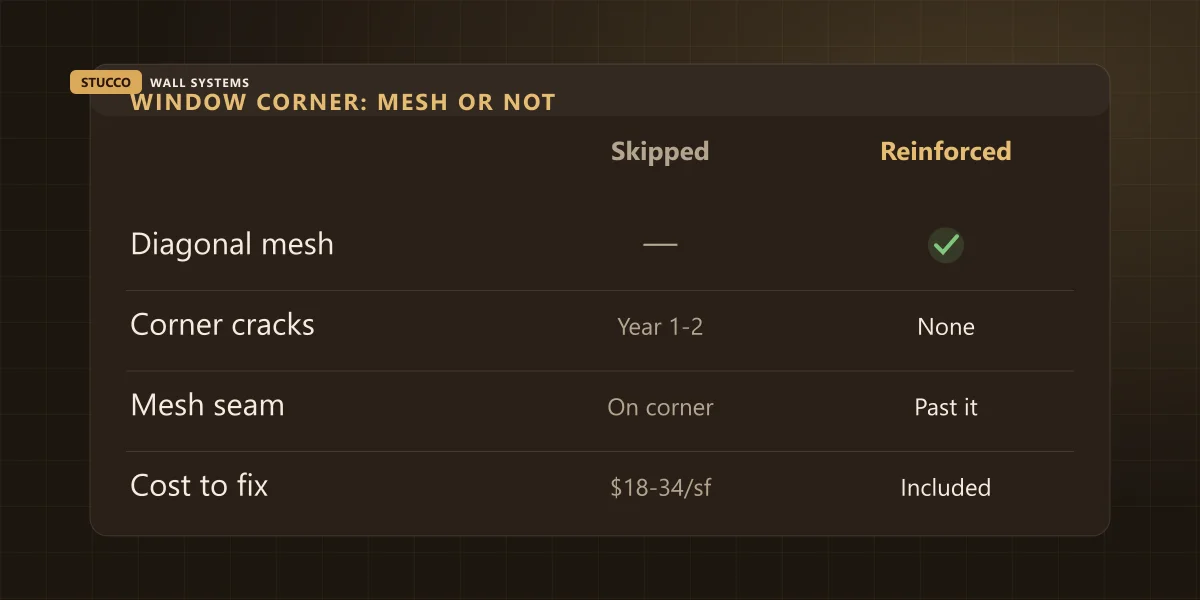
It is a separate square of mesh set diagonally across each corner of every opening, lapped over the field mesh, before the base coat goes on. It sits directly across the line the crack wants to travel and carries the tension the field mesh cannot. It costs a scrap of mesh and a few minutes per corner, and it is one of the first things to go missing when a price gets cut.
There is a companion detail that matters just as much and gets even less attention: where the field mesh seams land. Mesh comes in sheets and the sheets have to lap somewhere. A lap is the weakest line in the base coat, so if a crew lets a seam finish on an opening corner, they have built a crack in on purpose. The field mesh should run continuous past each corner, with the diagonal patch on top of it.
None of this is expensive at the time, which is the frustrating part of the arithmetic. Corners are one of the quiet places three dollars a square foot goes missing, and I took that comparison apart layer by layer in why the cheapest stucco quote costs the most.
| At every opening corner | Reinforced properly | Skipped |
|---|
| Diagonal mesh patch | Set across each corner, lapped over the field mesh | Nothing but field mesh, running square to the wall |
| Where the mesh seams land | Continuous past the corner | Often finishing right on it |
| First few winters | Movement spreads out across the patch | A hairline opens at the corner and grows each freeze-thaw |
| What it costs | A scrap of mesh and minutes, inside the $8–$16 per sq ft install | Nothing then — $18–$34 per sq ft to cut back and rebuild later |
The other thing happening at that window: water
An opening is the largest single interruption in your wall’s drainage path, and the order the parts go in decides whether it works. Everything laps over the thing below it, like shingles. Sill first, then the jambs over the sill, then the head over the jambs, and sealant last. Get the order wrong and every piece is present while water still gets behind them.
| In this order | What it does | What happens when it is skipped or reversed |
|---|
| 1. Sill pan under the opening | A tray with a back dam and turned-up ends that catches anything past the frame | Water sits on the rough framing under the window and rots it from underneath |
| 2. Jambs lapped over the sill pan | Sends water down onto the pan instead of behind it | Water crosses behind the pan and misses the exit completely |
| 3. Head flashing over the jambs | Catches the runoff arriving from the whole wall above the opening | Water enters at the top corners — the stain shows up months later |
| 4. Sealant last, three sides only | Seals the joint while leaving the bottom open so the pan can drain | Sealed all four sides, the pan fills and has nowhere to send it |
That last row is the one I would tattoo on a few people. A window is designed to drain. The tray under it only works if it has somewhere to empty, so you seal the head and both jambs and you leave the bottom alone. Sealing all four sides feels thorough and turns the pan into a bathtub inside your wall.
The metalwork side of this — what flashing is, how it laps, why a bead of caulk is not a substitute for any of it — I went through properly in flashing explained for homeowners. Everything there applies at an opening, only more so, because the opening is where the most joints meet in the smallest area.
Why a window replacement is the most common cause I see
Because replacing windows in a stucco house means cutting the stucco, and the wall detail sits in the gap between two trades. The window crew is scoped to fit a window. The perimeter — the flashing, the drainage, the base coat, the texture match — belongs to nobody unless somebody wrote it down. Usually nobody wrote it down.
What I find on those walls a year or two later is consistent. Expanding foam pushed into the gap and treated as waterproofing, which it is not. A heavy bead of sealant smeared over the cut edge of the old stucco, hiding the fact that the finish was never rebuilt. No sill pan re-established, because getting to it would have meant opening the wall further. And very often that fourth-side bead sealing the bottom of the frame solid.
There is a related order-of-operations mistake worth knowing about, and it comes straight from Natural Resources Canada rather than from me. Their guidance on upgrading windows and doors is blunt about it: “Caulking on the outside of a window should be done only after interior sealing is complete. If the exterior is caulked first, it can trap warm, moist air in the wall, which over time, can damage the wall.” You can read it in Section 8 of Keeping the Heat In. A crew that caulks the outside on the way to the next job has it backwards, and the damage shows up in the wall rather than at the window.
All of it is avoidable with four questions asked before anybody starts cutting.
| Ask before the window job starts | The answer you want | The answer to stop and sort out |
|---|
| Who cuts the stucco back at the opening? | Named in a quote, with how far back it gets cut | “We just trim it as we go” |
| Who re-establishes the sill pan and head flashing? | A named trade, with both items listed | Flashing has not come up once |
| Who rebuilds the base coat, mesh and texture match? | A stucco scope with the texture match called out | “We will caulk it, it will look fine” |
| Who covers a leak at that perimeter in two years? | One trade’s workmanship warranty, in writing | Two trades each pointing at the other |
Getting that in writing is worth more than any discount either trade offers you — the same principle as reading what a warranty actually excludes, which I went through in what a stucco warranty is actually worth. If your windows are already done and the perimeter was left as I described, that is what a stucco repair assessment is for.
How do I check my own windows from the ground?
In about ten minutes, with no ladder, on one elevation at a time. You are looking at the corners for angled hairlines, at the bottom of the frame to see whether it has been sealed shut, at the wall under both bottom corners with your hand, and then inside at the drywall return. Four checks per window, and you will know whether to call anyone.
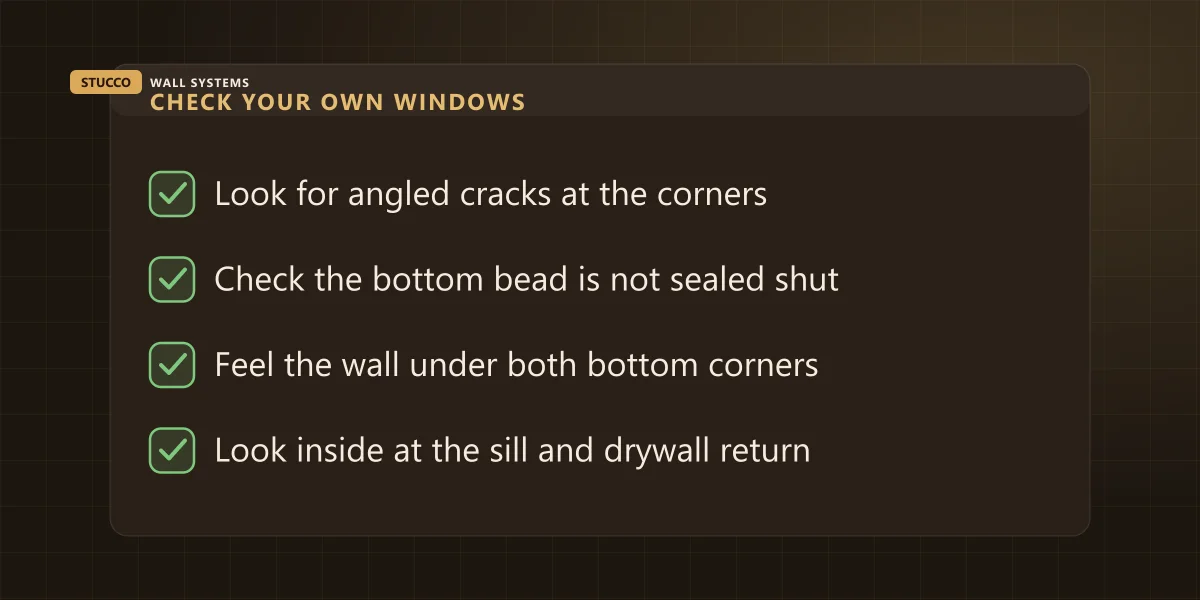
Start at the four corners. Angled hairlines running out and up are what you are after. Note which corners, and whether the neighbouring windows on that elevation are doing the same thing. Same corner on several windows is the systemic version and changes the whole scope.
Run a finger along the bottom of the frame. If there is a continuous bead of sealant where the frame meets the wall along the bottom edge, the drainage path out of that opening is closed. On a house where the windows were replaced, this is the first thing I check and the thing I most often find.
Press the wall under both bottom corners. A sound wall feels solid, like knocking on a countertop. Soft, springy or hollow means the substrate under there is already wet, and at that point the crack at the corner is the least interesting thing about the window. The rest of the symptom list is in the six signs water is behind your stucco.
Look at the sill itself. Whatever sits under the window — a stucco sill, a stone one, a metal one — should visibly slope away from the house. Flat holds water, and a sill sloping back toward the wall feeds it straight into the joint every time it rains.
Then go inside and look at the return. Bubbling paint on the drywall beside the window, a dark line at the bottom corner of the interior sill, or a musty smell in that corner of the room. Those get blamed on condensation more often than they deserve, and plenty of them are perimeter stories.
What does fixing stucco around a window cost in the GTA?
It depends entirely on which of three problems you have. Cosmetic hairlines are crack repair at $120 to $400 each. A tired perimeter joint is resealing work at $6 to $12 per linear foot. A corner that has to be reinforced properly means cutting the finish back and rebuilding that section, at $18 to $34 per square foot over a small area.
| What is actually wrong | What the work involves | What it costs |
|---|
| A hairline corner crack, wall sound behind it | Cut out, reinforce the crack, patch and texture match | $120–$400 per crack |
| Perimeter sealant at the end of its life | Cut the old bead out, prep, reseal three sides | $6–$12 per linear foot |
| Corners cracking on several windows | Cut back at each corner, add reinforcement, rebuild | $18–$34 per sq ft over small areas |
| Framing already wet at a sill | Strip to substrate, dry it out, re-flash, rebuild | $1,500–$5,000+ |
| Openings done as part of a re-clad | Corners and flashing are simply part of the assembly | Included in $8–$16 per sq ft installed |
Most repair work we do lands between $450 and $2,500 all in, and the full line-item schedule is on our stucco repair page if you want to price your own list. The crack-by-crack version of this table, with what each crack type means, is in stucco crack repair costs in the GTA.
That last row is the honest summary of this whole page. On a residential re-clad or a commercial facade, corner reinforcement and opening flashing sit inside the per-square-foot price, because they are part of the assembly. They become a separate bill only when somebody left them out of a wall that is now finished, since the only way to put them in is to take the finish back off.
The honest bottom line
Windows are where a wall gets complicated: the most joints, the most movement, the most water, all in the smallest area on the elevation. Get the corners reinforced and the perimeter drained in the right order and those openings will outlast the finish over them. Skip either one and the wall will tell you which, at the corner, usually in the second or third winter.
If your corners have started to open or your windows were replaced and nobody rebuilt the perimeter, send me the address and a few photos from the driveway — straight on at the windows, plus one of the bottom of a frame. The assessment is free and written, whether it turns into a few hundred dollars of crack work or nothing at all. We work across Oakville, Mississauga and the rest of the GTA, fully insured and WSIB covered, with 25+ years of finished walls in our project portfolio and a 4.3-star rating from 12 Google reviews you can go and read yourself.