Every few months I get called to a house where the walls look perfectly fine from the driveway and the ceiling inside is stained in a line along the outside edge of a room. A roofer has usually been up there twice already, and the roofer is not wrong — the roof is fine. The problem is the stucco parapet wall: the piece of wall that carries on past the roof line and stands up on its own. It has nothing over it, it takes weather on three surfaces, and on flat-roof homes and plazas across the GTA it is almost always the first thing to go.
What is a parapet wall, and why does the stucco fail there first?
A parapet is a wall that continues above the roof line instead of stopping under an eave. That gives it weather on three surfaces instead of one, no overhang to shed rain off the face, and no warm side to dry toward. It is the same stucco as the wall below it, living a much harder life, and it ages several times faster.
You will find them everywhere once you start looking. Flat-roof contemporary infill through Toronto and the Thornhill and Vaughan pockets where that style took hold. The low wall around a flat garage roof or a covered porch on an otherwise ordinary pitched-roof house. And every plaza and industrial unit on the arterials — a parapet is what hides the mechanical units and gives a low building its straight line across the top.
The wall below your roof line has an overhang keeping rain off it, and it dries toward a heated house. A parapet has neither. It is outdoors on the front and outdoors on the back, so it is cold right through, and its top surface is horizontal — the hardest thing to keep dry on any building. Snow sits on it, meltwater sits on it, and every freeze-thaw cycle from December to March works on whatever soaked in. We already know what a wall does where a roof meets it — that is the roof-wall junction, and it is a leak point on its own. A parapet is the harder case, because there is no roof over the wall at all.
The metal cap is the real roof of that wall
The stucco on a parapet is a finish, not a roof. The waterproofing at the top of the wall is the metal cap — the coping. If that cap is right, the stucco under it can last decades. If it is flat, badly jointed or screwed through the top face, the wall wets from above, and no amount of patching the face will ever fix it.
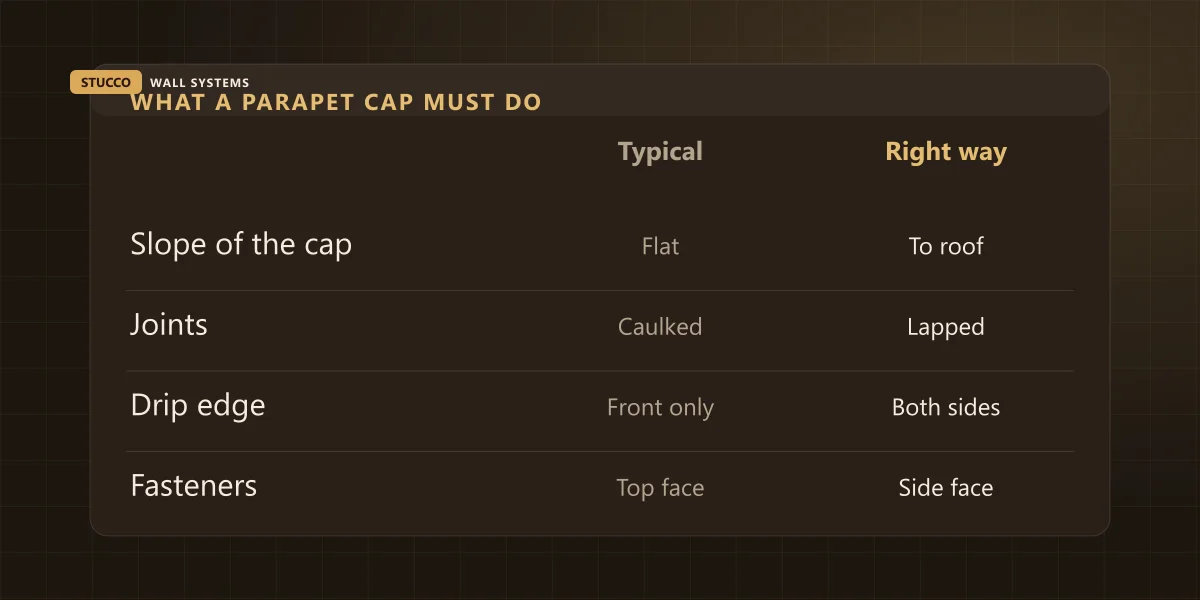
Four things decide whether a cap works, and I can usually tell from the sidewalk how many were skipped.
Slope. A cap should tip back toward the roof, never dead flat and never toward the street. A flat cap holds water on the one surface with no drainage plane under it. A forward tip drains fine but washes road dirt and metal oxide down your finished face, and you get a dark curtain under the cap within two summers.
A drip edge on both sides. Water running off metal clings to the underside and travels back along it to the wall unless a hemmed edge breaks it off. The front drip is standard. The back one — facing the roof, where nobody looks — I find missing more often than I find it there.
Joints that can move. Over a twenty-foot run, the difference between a January night and a July afternoon is visible. Two cap ends butted with a bead of sealant between them is a two-year detail: it opens every summer, the sealant tears, and you have a slot in the roof of your wall. Joints want to be lapped or splice-plated underneath.
Fasteners in the side, not the top. Every screw through the top face is a deliberate hole in the only horizontal waterproofing you have — neoprene washer or not, and there are usually dozens of them.
| Detail | What I usually find | What it should be |
|---|
| Slope of the cap | Dead flat, or tipped toward the street | Tipped back toward the roof, so run-off lands on the membrane instead of your finished face |
| Joints in the cap | Two ends butted and caulked | Lapped or splice-plated underneath, so the joint can move without opening |
| Edges | A drip hem on the front only | A hemmed drip on both faces — the back one is the one I almost never find |
| Fasteners | Screwed down through the top face | Fixed through the side face or clipped, so nothing penetrates the top of the wall |
| Corners and ends | Mitres cut on site and sealed with caulk | Corners and end pieces made as pieces, with the sealant as backup rather than as the joint |
Where water actually gets into a parapet
Four entry points, and only one of them is the stucco. In order of how often I find them: the joints in the cap metal, the back face where the roof membrane dies into the wall, the screw holes through the top of the cap, and the inside corner where a low parapet runs into a taller wall. Notice that three of the four are metal, not plaster.
1. The cap joints. By a wide margin the most common. An open joint is a slot pointed straight down into the top of a wall that has no way to drain and, in winter, no way to dry.
2. The back face, at the membrane. The roof membrane should run up the back of the parapet and terminate high, held by a bar or a reglet. What I sometimes find instead is stucco run all the way down the back face to die onto the membrane — a butt joint between two very different materials at the wettest spot on the building, under water every time it rains hard.
3. Screws through the top. A dozen small holes in a horizontal surface, each relying on a rubber washer that has been in UV since the day it went in.
4. The inside corner. Where a low parapet runs into a higher wall — a stair bulkhead, a second storey, the neighbour’s building on a semi — the cap has to stop and terminate into that wall. Fiddly metal, out of sight, and where I find the most creative sealant work of anybody’s career.
Now the part that saves people the most money, and it is the reason for that stained ceiling in the first paragraph: water getting in through the top of a parapet lands on the roof deck, underneath the membrane. It does not run down the inside of your wall where you would expect to see it. It runs onto the deck and shows up as a stain on the ceiling within a foot or two of the outside wall. So the owner calls a roofer, the roofer floods the roof, finds nothing, and everybody concludes it must be condensation. If your stain is on the ceiling near the perimeter and the roof keeps testing clean, stop looking at the roof and look at the top of the wall.
How to read your own parapet from the ground
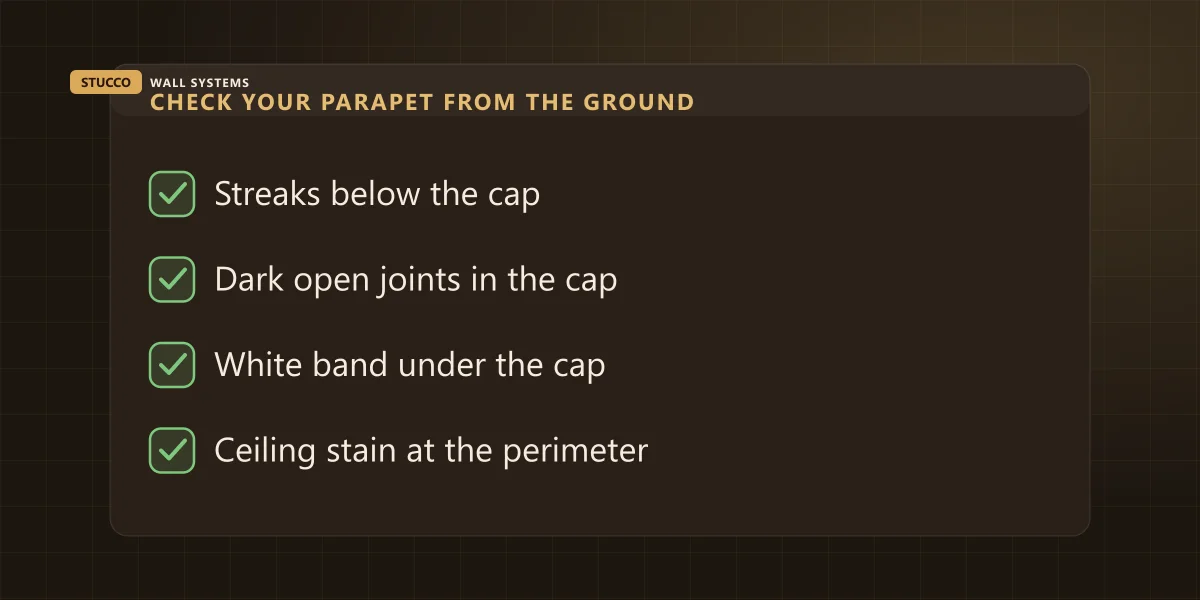
You do not need to go up there, and please do not. Almost everything worth knowing about a parapet can be seen from across the street with a phone camera zoomed in, plus one look at your own ceiling. Five checks, ten minutes, no ladder.
- Streaking below the cap. Dark vertical runs starting right under the metal mean the cap is shedding water onto the face instead of onto the roof — cosmetic today, but a signal about slope.
- Dark lines in the cap itself. Zoom in on the metal. An opened joint reads as a thin dark line with a shadow. If you can see it from the street, it is open.
- A white band under the cap. A horizontal chalky bloom across the top of the wall is salt left behind by water moving through from above. That is efflorescence, and in a band under a cap it tells you exactly where the water is getting in.
- Bulging or drummy top corners. Corners take it from two directions and let go first. If the finish looks proud of the wall or sounds hollow on a knuckle-tap, the base under it is wet.
- The ceiling, after weather. Check the outside edge of upstairs rooms after heavy rain, and again after a January thaw. Rain says water is getting in; a thaw says it is already up there.
One more if you can do it safely: from an upper window or a neighbour’s place, look at the back face. Almost nobody has ever seen their own, and it is the side that gets no attention.
Why a small parapet repair is never a small price
Because a parapet is not a small piece of wall. Thirty linear feet of parapet is thirty feet of front face, thirty feet of back face and thirty feet of top — and the work happens in the one place on a flat roof where nobody is allowed to stand casually. Three things drive the price, and only one of them is stucco.
First, you are finishing both sides of the same wall. People price a parapet in their head as the bit they can see. The back face is that area again, harder to reach off a roof than off a scaffold, and it is the neglected one.
Second, a second trade is involved. Cap metal is a sheet-metal shop’s work, not mine, and I will not publish a linear-foot rate for it — it moves with the profile, the gauge and the number of corners, and a made-up number would only make your real quote look wrong.
Third, the work is at the perimeter edge by definition. Ontario’s guidance for construction work on flat roofs applies where the roof is more than three metres above grade, and under O. Reg. 213/91 a minimum safe distance of two metres from the perimeter edge must be established. Read that with a parapet in mind: the safe zone is measured away from the exact thing we came to work on. So the job means guardrails or a tied-off system before a trowel leaves the bucket — the same reason access costs land where they do on any elevated work.
Here is the stucco side, on the rates we publish everywhere else:
| The job | Typical range | The honest note |
|---|
| Re-lap and re-terminate open cap joints, no stucco work | $120–$400 | The cheapest thing on this page, and usually the whole fix. Do it before the wall gets involved |
| Crack repair and patching on a parapet face | $450–$1,200 | Assumes the cap above it is sound. If it is not, this is money spent on the symptom |
| Top of the wall opened, wet sheathing found | $1,500–$5,000+ | The price follows what is wet, not what is stained — and on a parapet the wet part is usually longer than the mark |
| Refinishing an opened parapet, both faces | $18–$34 / sq ft | Detail work over an opened area. Remember to count both faces and the return at the top |
| Parapet included in a full re-clad | $8–$16 / sq ft | Our installed residential range. The top of the wall will never be cheaper than while the scaffold is already up |
| Commercial parapet band on a plaza | $10–$18 / sq ft | Our commercial range — phasing and access decide where inside it you land |
Take one thing from that table: the $120–$400 line and the $1,500–$5,000 line are the same building, two or three winters apart. Most expensive stucco repair at the top of a wall started as a joint you could have seen from the street.
Who owns the parapet — the roofer or the stucco crew?
Usually nobody, and that is the whole problem. The roofer’s scope stops where the membrane terminates on the back face. My scope starts at the finished face. The metal cap sits in the gap between those two contracts, assumed by both and priced by neither. The fix is one line in a scope of work: name the owner of the cap in writing before anybody mobilises.
| The item | Who normally owns it | What to confirm in writing |
|---|
| Roof membrane and its up-turn on the back face | Roofer | How high it terminates and what mechanically holds the top of it |
| Stucco on the front and the back face | Stucco crew | That the back face is actually in the price — it is the most commonly forgotten area on any quote |
| The metal cap, its corners and end pieces | Named in writing — usually sheet metal | The single most-assumed item on a flat-roof job. If nobody names it, nobody bought it |
| Sealant at the cap-to-wall line | Whoever supplies the cap | That it is understood as a wear item on a schedule, not a permanent detail |
| Making good after roof anchors and tie-backs | Named in writing | Anchors put real penetrations through the top of a wall that then gets closed up and looks perfect |
Sequence matters too: the membrane and its up-turn go on before the wall is finished, and the cap goes on near the end with the finish held back at the top so the metal sets into a clean line. Finishing the parapet completely first, then asking a sheet-metal crew to make a cap fit whatever they find, is how you end up with the caulked mitres.
The short version
A parapet has no roof over it, weather on both faces and a horizontal top, so it fails years before the wall underneath it. The metal cap is the real waterproofing up there, and three of the four ways water gets in are metal details rather than stucco ones. Water entering the top lands on your roof deck and stains the ceiling near the perimeter, not the wall — which is why these leaks get chased for years in the wrong place. A joint you can spot from the sidewalk today is a few hundred dollars; the same joint after two winters is a few thousand.
We finish and repair parapets on houses and on commercial buildings across the GTA, and there are finished elevations in the project gallery. If your ceiling is staining near an outside wall and the roof keeps testing clean, send us the address and a zoomed-in photo of the top of the wall or call (905) 973-6470. Half the time I can tell you from the photo that it is a cap joint — and that is the good-news version.