These calls all start the same way. A stain in a front bedroom ceiling corner, or a dark line down the wall above the garage, and the roofer has already been out and said the roof is fine. He is usually right. The stucco roof-wall junction — where a sloped roof dies into a wall that keeps going up — is where most of the leaks I get called to actually start, and it belongs to neither trade.
It is also the worst piece of arithmetic on your house. One inch of rain on a twenty-by-fourteen garage roof is roughly 650 litres of water, and all of it leaves along one twelve-foot strip of wall. Get that strip wrong and you are pouring a season of rain into the bottom corner of a wall, a bucket at a time, for years before anything shows up inside.
What is the roof-wall junction on a stucco house?
It is any line where a sloped roof surface ends against a wall that carries on upward. There are only three kinds on a house and they behave differently: a sidewall running alongside the slope, a headwall the slope runs straight into, and the eave end where a sidewall stops over the eavestrough. Each wants a different piece of metal.
You already know where yours are. The projecting garage on almost every Erin Mills subdivision house gives you a sidewall down each side of its roof and an eave end at the bottom of each. A porch roof running into the wall above it is a headwall. A dormer gives you all three at once, which is why the dormered houses through the Kingsway punch above their weight in leak calls.
| Junction | Where it is on a GTA house | Metal that belongs there | How it usually fails |
|---|
| Sidewall | Along the slope of a projecting garage roof, or a dormer cheek | Step flashing — one short piece per shingle course, woven in as the roof is laid | One long continuous strip instead of steps, or nothing at all behind the last course |
| Headwall (apron) | A porch or one-storey addition roof running into the wall above it | Apron flashing in a continuous length, vertical leg turned up the wall behind the paper | Sealed to the face of the stucco instead of tucked behind it; the bead cracks and there is nothing underneath |
| Eave end of a sidewall | The very bottom of a garage roof edge, right where the eavestrough starts | Kick-out flashing — a one-piece formed corner with roughly a four-inch leg | Cut off, bent flat, or never fitted so the trough could hang straight |
Why does the roof-wall junction leak before the rest of the wall?
Because everything arrives there at once: two planes of water, three materials and two trades. A wall sheds a light, even film of rain across its whole face. A roof delivers a concentrated stream to one point. The junction is where the second hands off to the first, and it only works if the layers overlap in the right order.
Volume is the part homeowners underestimate. The wall two feet left of that junction handles the rain that lands on two feet of wall. The strip at the junction handles the rain that lands on the whole roof above it — the same reason a downspout discharging against a wall wrecks it in three years. I went through that in your roofline is a water system.
Then there is February. Natural Resources Canada puts an ice dam plainly in its Keeping the Heat In guidance on roofs and attics: melting snow runs down the roof, meets the ice mass and backs up, sometimes under the shingles. It adds that roofs with valleys, dormers or large overhangs are the most prone to it — exactly the geometry of a garage roof dying into a wall. Water backed up under shingles is not draining downhill. It is sitting against your wall.
How close to the shingles should stucco stop?
It should not touch them. The finish wants to stop with about two inches of daylight above the roof surface, ending in a proper termination bead rather than a raw trowelled edge. Stucco run tight down onto shingles is the most common defect I find at this junction, and you can see it from the driveway.
Cement stucco is porous by design — that is how it dries. Sit its bottom edge in wet leaf litter or a February snowpack and it stops being a wall that dries and becomes a wick. On a north-facing garage in Bronte, the snow pushed against that wall is still there in the second week of March, and everything behind the finish spends those weeks damp.
The lath is the first casualty, not the stucco. Metal lath in a permanently wet strip rusts, and rusting steel expands. It pushes the stucco off itself from the inside, which is why this failure so often appears as a horizontal band of finish letting go along the bottom of a wall while the rest of the elevation is sound. By then the fix is not cosmetic.
The gap has to be a real termination, though, not just an absence of stucco. A casing bead or drip gives the drainage plane behind the finish somewhere to exit above the flashing. A raw cut edge hands water an entry point at the wettest height on the house. Two inches is what the system manufacturers ask for in their own details, and it is what I hold.
What has to be behind the stucco at that junction?
Four things, in this order from the roof up: flashing fastened to the deck and turned up the wall, the water-resistive barrier lapped over the top of that upturned leg, the lath stopped short of the metal, and a termination bead at the finish. Get one lap backwards and the flashing funnels water into the wall.
It is the shingle principle, and it is the only rule that matters here: every layer laps over the one below it. Built that way, water past the finish runs down the paper, onto the metal, and out onto the roof. Tuck the paper behind the flashing leg and that same metal becomes a shelf, collecting everything and handing it to the sheathing. From outside, on finish day, the two look identical. That is the whole problem.
| Layer at the junction | Built right | The shortcut I keep finding |
|---|
| Flashing | Fixed to the roof deck, vertical leg turned well up the wall | A short leg, or a strip of self-adhered membrane asked to do the job of metal |
| Water-resistive barrier | Laps over the top of the flashing leg so drainage lands on the metal | Tucked in behind it, so everything draining inside the wall runs past the metal |
| Lath | Stops above the flashing, no fasteners driven through the metal | Run down over the flashing and nailed through it — a row of holes at the wettest line on the house |
| Stucco edge | Casing bead or drip, roughly two inches clear of the roofing | Raw edge trowelled down until it touches the shingles |
| Counter-flashing | Let into a kerf or a two-piece detail; sealant is the wear item, not the barrier | A bead of caulk on the face of the stucco and nothing behind it |
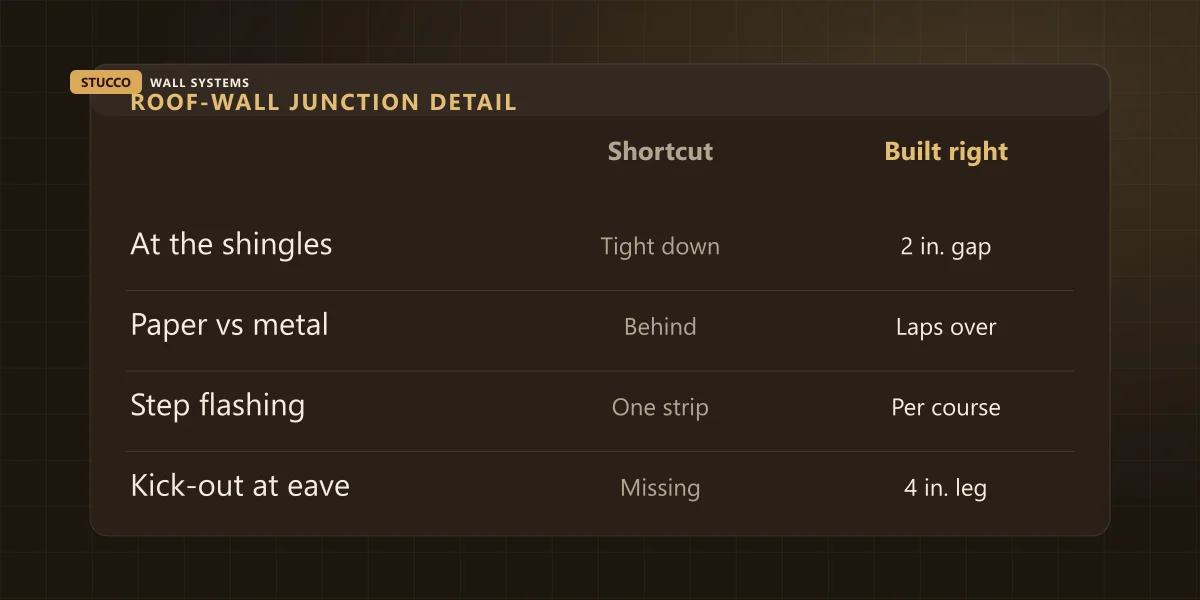
That last row is worth sitting with. Sealant at a junction is a wear item with a life measured in years, exactly like the sealed joints in what those lines on your wall actually do. Sealant used as the waterproofing gives the wall a maintenance deadline nobody wrote down, and when it passes there is nothing in reserve.
Why is the kick-out the piece that is always missing?
Because it is in everybody’s way. A kick-out sticks out into the line the eavestrough wants to occupy, so it gets cut off, bent flat, or left out entirely so the trough can hang straight. It is a two-minute piece of metal, and it decides where an entire roof’s worth of water lands.
Two details separate one that works from one that is decoration. It has to be a single formed piece, because the corner is the joint — two flat pieces bent together and caulked puts a seam at the point of maximum flow. And the leg needs depth, around four inches, to throw water into the trough rather than behind it. Spotting one from the driveway is in flashing, explained for homeowners.
How do I tell from the ground that mine has failed?
Look for a narrow vertical stain that starts exactly where a roof edge dies into the wall. Stains that run in a line come from a point source above; stains that spread in patches are just a dirty wall. Then check the ceiling corner of the room behind that spot. Most of these show up inside first.
A streak that starts at a roof edge, not at a window. Trace it upward. If the line stops dead at the bottom corner of a garage or dormer roof, you are looking at a defeated kick-out.
White bloom in that strip. Salt carried out of the wall by water that has been inside it. It reads as a stain but it is really a receipt — the whole thing is in efflorescence, explained plainly.
Paint blistering in a horizontal band above the roofline. Coating letting go along the line where finish meets roof is a wet-lath signal, not a paint-quality one.
A hollow or crumbly patch on that same strip. Knuckle-tap it. Cement stucco should feel dead solid; if a foot-wide band above the shingles sounds different from the wall a metre away, the lath under it is going.
Ice in the same place every winter. A thick icicle column at one corner, or a sheet of ice on the driveway under one specific spot, tells you where the water concentrates when it is not frozen.
Inside, the ceiling corner and the head of the garage door. Both sit directly behind the junctions on a projecting garage. The full diagnostic list is in six signs water is behind your stucco.
What does fixing a roof-wall junction cost in the GTA?
Almost entirely on when you do it. On a full re-clad the flashing sits inside the $8 to $16 per square foot and costs nothing extra. As a retrofit on a wall still sound it runs $18 to $34 per square foot over the small area we open. Once framing is wet, $1,500 to $5,000 and up.
| What the job is | What we actually do | GTA cost |
|---|
| During a full re-clad | The metal goes in as part of the assembly, on a wall that is already open | Included in $8–$16 / sq ft installed |
| Retrofit, wall still sound | Cut a strip back along the junction, flash it, re-lath, re-coat and blend the finish | $18–$34 / sq ft over the opened area |
| A typical twelve-foot junction | About 18 sq ft opened and rebuilt — twelve feet long, eighteen inches tall | $324–$612 on that same schedule |
| Sealant and a local patch only | Buys a season or two. Does not put in the metal that is missing | $300–$800 |
| Framing already wet | Strip to substrate, dry it out, replace what is rotten, rebuild the assembly | $1,500–$5,000+ |
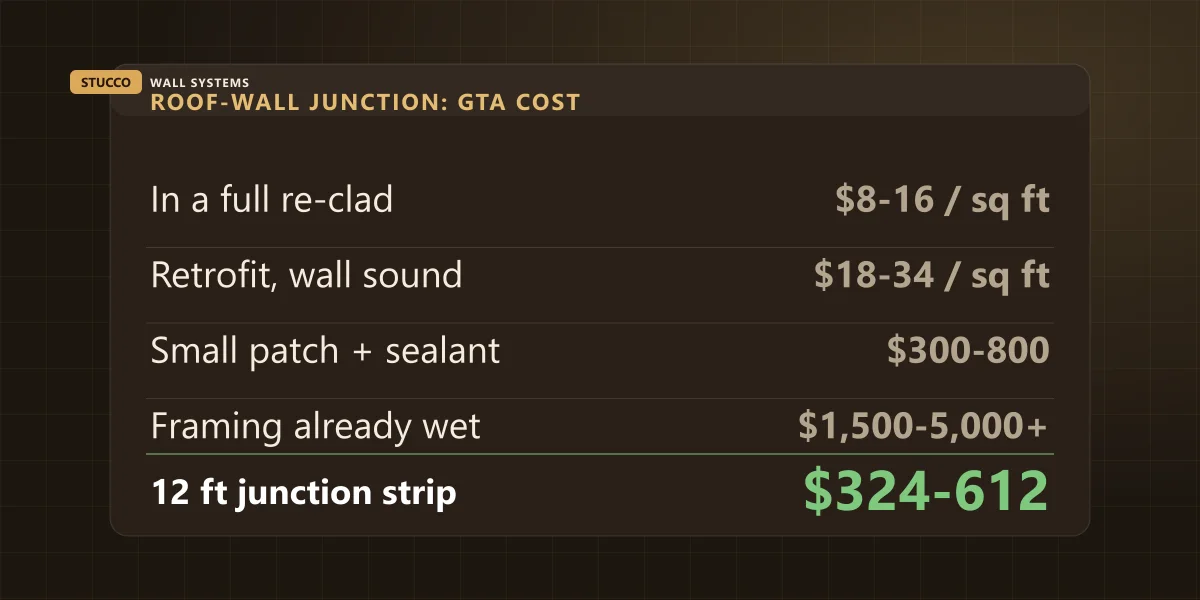
The metal costs the same in every row. What changes is the access and how much wet framing is waiting behind it. A junction retrofitted while the wall is dry is a few hundred dollars on our stucco repair schedule; the same junction after four winters of quiet feeding is a different job entirely.
I will be straight about the fourth row, because it is the one most people buy. A bead of sealant stops the visible drip and changes nothing about the assembly. It has a place — it is October and you would rather do the real work in April — but that is a decision, not a repair, and should be quoted as one. On a residential re-clad or a commercial facade it is not a separate line at all.
Who owns this, the roofer or the stucco contractor?
Both and neither, which is why it stays broken for years. The flashing is roofing work. The wall opened and closed around it is stucco work. When a roof is replaced on a stucco house, the junction is where the new roof stops and somebody else’s finished wall begins, and nobody prices a strip they are not allowed to cut.
So timing matters more than trade. If you are re-roofing a stucco house, settle the junction detail before the shingles go on and ask specifically about the kick-outs — retrofitting one after the eavestrough is hung costs several times what it costs while the trough is down. If you are re-cladding, expect the stucco crew to go up and look at what the roofer left rather than take your word for it.
Ask for it in writing: which junctions, what metal, who lifts the shingles, who closes the wall. The quote written from a car window never has a line for any of it, because looking at a roof-wall junction means getting out of the car and putting a ladder on the house.
I do not do your roof. What I will do is open the wall at the junction, tell you what is behind it, and put the assembly back in the right order — far better the same week your roofer is on the ladder than two years after he left. We see this constantly through Etobicoke and the Kingsway, where the roofs have been done twice and the junctions never once.
The honest bottom line
Four square feet of wall decides the condition of the other two thousand. A junction built in the right order is invisible, needs nothing from you, and outlives the finish over it. The same junction with the paper behind the metal and the stucco trowelled onto the shingles looks identical on handover day — and costs five thousand dollars in fifteen years, usually to whoever bought the house from the person who saved the money.
If you have a stain that starts where a roof meets a wall, send me the address and a couple of photos from the driveway or call (905) 973-6470. Photograph the whole elevation, not the stain — I need to see what is above it. The assessment is free and written either way. Twenty-five years of finished walls are in our project portfolio, we are insured and WSIB covered, and our Google reviews are there to read.