The straight lines running down a stucco elevation, usually with a dark bead of sealant in them, that make a wall look like it was built in panels — those are stucco control joints. I get asked to take them out for looks far more often than I get asked to put them in, which tells you how badly this trade has explained them. So: what has to sit behind that line before it does anything, how to spot a groove that only pretends to be one, and what a wall does with none.
What is a control joint in stucco?
A control joint is a deliberate break through the stucco and its reinforcement that divides a large wall into smaller panels. Every wall moves as it cures, heats, cools and settles. The joint lets two panels move independently instead of dragging that movement across one continuous sheet of finish until something gives.
The movement is not optional. Cement finish shrinks while it cures. Every wall is longer on a July afternoon than on a January night, and the south and west elevations swing far more than the north. Framing lumber keeps drying through its first couple of years. All of that has to go somewhere, and a stucco elevation is a rigid sheet with nowhere to put it.
Cut the sheet into panels and each one takes its share at its own edges, where a joint is built to open and close a fraction of a millimetre without tearing. Leave it whole and the movement still happens — it picks its own exit, and it picks the weakest point it can find, normally a window corner or an inside corner. That failure pattern is in why stucco cracks in GTA winters.
Is that line on my wall a joint or a crack?
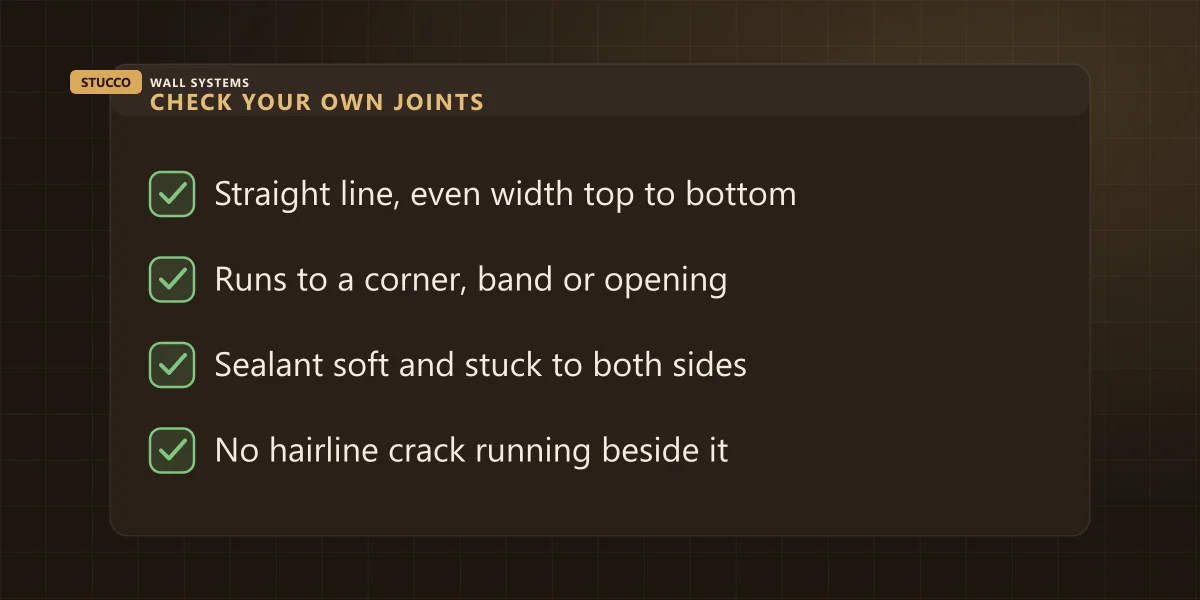
A joint is straight, an even width top to bottom, and runs the full height or length of a panel — corner to corner, or between two features. A crack wanders, changes width along its length, and usually starts at the corner of an opening. Joints look drawn on. Cracks look torn.
| What you are looking at | How it reads | What it is |
|---|
| A straight line, even width, sealant or a metal edge in it | Deliberate, and it repeats across the elevation | A control joint |
| A crisp recessed line matched to the wall, no sealant | Lines up with windows, floors or a band | A reveal, which may also be doing the joint’s job |
| A line that wanders and changes width along its run | Usually in one place only, often from a corner | A crack |
| A straight line with the sealant split, hard or gone | A dark slot you can get a fingernail into | A joint that has stopped working |
The second row confuses people most. A reveal is a designed shadow line that can carry the movement a control joint would have — but only when that was decided before the wall went up. The difference is in the stucco details that make custom homes look custom.
How do you tell a real joint from a groove in the finish?
A real joint goes through the finish, the base coat and the reinforcement behind it, so the two panels are genuinely separate. A groove tooled into the finish coat alone is decoration: the base coat and mesh run straight underneath it, they carry the stress across, and the wall cracks anyway — often a few inches to one side.
This is where money gets saved on a cheap job, and it is invisible from the ground. Cutting the reinforcement and setting a joint accessory takes time, and it happens early, before anything is coated. On a finished wall you cannot tell a built joint from one drawn in at the end with a jointing tool. Both are a straight line with a shadow in it.
What you can read from the driveway is the evidence. A hairline crack running parallel to a joint, a hand’s width away, means the wall moved and the line beside it did not take the movement. So does a crack that crosses a joint and carries on the other side — a working joint terminates a crack, and the crack should stop dead at it.
The ends are the other tell. A real joint runs to something: an outside corner, a soffit line, the underside of a band, the head of an opening. A groove that starts and stops mid-field was placed by eye, not by a layout.
There is a version of this I like even less. A crew freshening up an elevation decides the dark lines look untidy and packs them solid with finish material. That welds the two panels back together with the material meant to keep them apart, and the wall splits along that line within a season or two — only now it is a torn edge instead of a straight one. If someone offers to make your joints disappear with a trowel, that is what is on offer, and it is the same economy I take apart in why the cheapest stucco quote always costs the most.
Where do control joints belong on a wall?
At every change of wall plane or height, wherever two different structural systems meet, at inside corners, and roughly every 12 to 18 feet along a long unbroken run. Exact spacing is a manufacturer and code question that belongs on the drawings, not a chalk-line decision made on the morning the crew starts.
That list answers where a joint has to go. Where it should go is a second question, and it decides whether an elevation looks composed or looks divided.
Inside the range the system allows there is usually a foot or two of freedom, and using it costs nothing. A vertical joint landing two feet off the edge of a window looks like a mistake; moved across to the jamb it reads as part of the elevation. A horizontal joint at the height of the window heads looks like a band. Eight inches above them, the wall looks cut in half.
That is a five-minute conversation at the drawing stage and an impossible one afterwards, because moving a joint on a finished wall means rebuilding the finish on both sides of it. The builder-facing version — joint layout on the elevations, weep screed callouts, what I check at a PDI — is in what builders should spec on a new build, and it is the coordination we ran on our Oakville new-build stucco installation.
What happens on a wall built without them?
The wall divides itself anyway, on its own schedule and in its own places. Cracks turn up at the corners of windows and doors, at inside corners, and across long runs that had nothing to break them. The wall ends up in panels either way. The only thing decided in advance is whether the lines are straight.
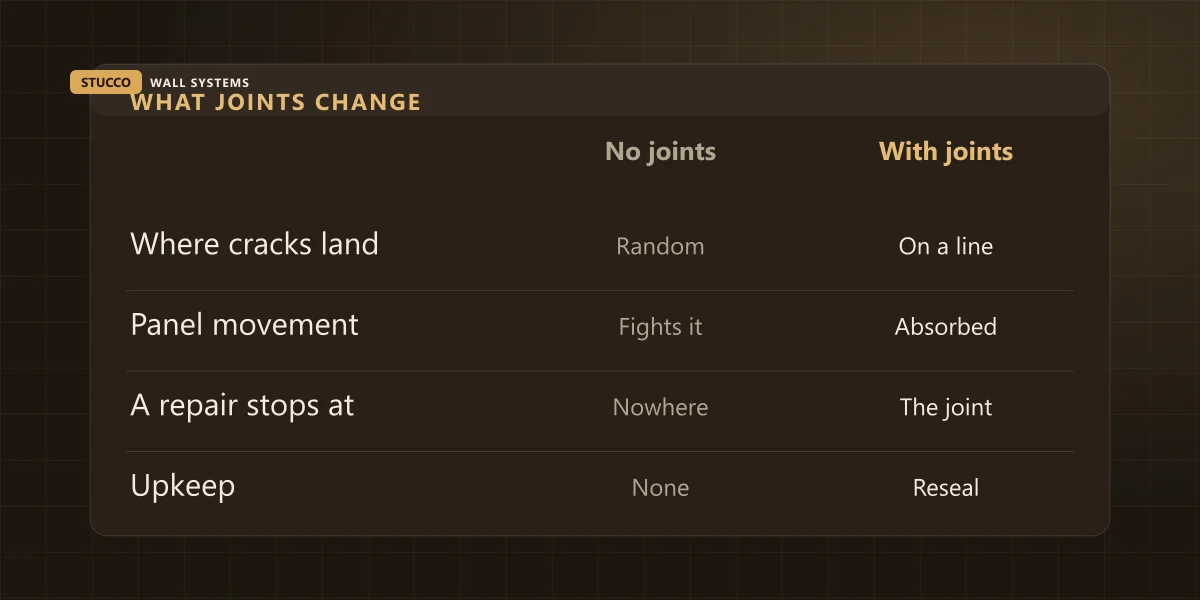
| No control joints | Joints where they belong |
|---|
| Where cracks land | Window and inside corners, wherever the wall is weakest | Along a line somebody chose |
| What the movement does | Opens a path into the assembly at a random point | Opens and closes a detail built to take it |
| What a repair looks like | A feathered patch in the middle of a field of finish | New finish carried to the joint and stopped there |
| Upkeep | Nothing to maintain, and nothing helping either | Sealed joints checked and resealed on a cycle |
| What it costs later | $120–$400 per crack, sometimes on the same line twice | $6–$12 per linear foot of resealing |
That third row is worth more than it looks. When a repair cannot be made to vanish, the fix is to carry the new finish to the nearest natural break and stop — and a wall in sensible panels always has one within reach. A wall with no joints leaves a crew in the middle of forty feet of finish with nothing to stop at, which is how you get a feathered patch that catches the evening light. The mechanism is in why stucco repairs show, and how matching really works.
It matters more again on a commercial facade: a long flat storefront or industrial wall has fewer windows and corners to break it up, so the panels get big fast and there is more surface swinging through the same temperature range.
Do control joints need maintenance?
Some of them do. A joint made with a metal or PVC accessory works mechanically and needs almost nothing. A sealed joint — backer rod with a flexible sealant over it — is a wear item, and the sealant is usually good for five to ten years in GTA weather before it hardens, splits or lets go along one edge.
A sealed joint that has lost its sealant is worse than plain wall at the same spot, and the reason is geometry. A joint is a deliberate opening kept watertight by the flexible material in it. Take that away and you have a vertical slot pointing into the assembly, collecting everything that runs down the wall above. On an EIFS wall it leads to the edge of the foam. That is the route from a cosmetic maintenance item to the $1,500–$5,000+ conversation about wet framing.
| What the joint looks like | What it means | What it needs |
|---|
| Sealant firm, stuck to both sides, slightly recessed | Working as built | Nothing — look at it again next spring |
| Sealant hard, glossy or crazed across the surface | Near the end of its service life | Reseal this season, $6–$12 per linear ft |
| Split down the middle, or pulled off one edge | Water is already getting in behind it | Reseal now, before freeze-thaw opens it further |
| A hairline crack running parallel a few inches away | The joint is not taking the movement | An assessment — the joint may be decorative |
| Packed solid with finish material or paint | The panels are locked back together | Cut it open again and seal it properly |
None of that takes tools. It is a slow walk along each elevation with your eyes at joint height, twice a year, and it fits inside the walk-arounds I already recommend — the one-hour fall checklist before the snow and the 15-minute spring walk-around after the thaw. CMHC on maintaining your home makes the general point plainly: small envelope maintenance is what stops it becoming structural work later. Joint sealant is about as small as that gets, and it is priced as part of our caulking and sealant work.
One warning about product. A joint needs sealant that stays flexible for years and stays stuck to a porous, dusty surface. A tube of general-purpose caulk is not that, and the wrong material behaves like a joint filled with finish: it holds one season and splits. The same goes for sealant at flashings, which is a separate job from the metal itself — see flashing explained for homeowners.
Can control joints be added to a wall that has none?
Yes, by saw-cutting a line through the finish and base coat and building a sealed joint into the opening. On a wall that keeps cracking along the same line, that is often the right repair. On a sound wall with no cracking, cutting joints in as a precaution is rarely where I would spend the money.
| Your situation | The honest call | Typical cost |
|---|
| A crack that keeps coming back on the same line | Cut a joint in on that line and seal it | $120–$400 per crack |
| Long uninterrupted elevation, refinish already planned | Add the joints while the wall is open | Inside the $9–$16 per sq ft refinish |
| A section being rebuilt after water damage | Joints go back in as part of the rebuild | $18–$34 per sq ft for that section |
| Sound wall, no cracking, joints simply missing | Leave it, watch it, reseal what is there | Nothing until something moves |
| New build or a full re-clad | Joint layout settled on the drawings first | Inside $8–$16 per sq ft installed |
The second row is the one people miss. If an elevation is being refinished anyway, the joints are the cheapest they will ever be — the access, the scaffold and the finish coat are already paid for. Adding them a year later on their own means paying for all of that again for a line of sealant. Most repairs on a house land between $450 and $2,500 in total, and the crack-by-crack breakdown is in what stucco crack repair actually costs in the GTA.
Can a stucco wall have no visible lines at all?
It can come very close. Sealant is available in colours and can be matched to the finish rather than left as a black stripe. Joints can be aligned with window jambs, heads and band lines so they read as part of the drawing. A reveal can carry the movement instead. What cannot be done is deleting the movement itself.
This is the request I get most often on the phone, usually from someone looking at a 1990s elevation where the joints sit with no relationship to anything else on the house. That homeowner is not wrong about how it looks. The answer is to move the lines and match the colour at the next residential refinish rather than fill them in. On a big estate elevation where the whole point is that nothing shows, the reveal-led approach we run on custom homes is the route.
What I will not do is take joints out of a wall and give you nothing in their place. If someone quotes you that as a cosmetic job, ask them what is handling the movement afterwards, and listen carefully to the answer.
The honest bottom line
Walk one elevation this week and look at the lines on it. Are they straight and even, do they run to something at both ends, and is the sealant in them soft and stuck to both sides? Is there a hairline crack running alongside any of them? Those four answers tell you whether your wall was divided on purpose or is dividing itself.
Joints are a small line item on a quote and a large one in how a wall ages. On a new build or a re-clad they are close to free, because they are drawn before anyone mixes anything. On a finished wall they cost real money to add, and the sealed ones are a maintenance item with a service life, like everything else outside a house.
If you are looking at a line on your wall and cannot tell what it is, send me the address and a photo of the elevation or call (905) 973-6470. The assessment is free and the quote is written and fixed, and it will say plainly whether that line means a repair, resealing, or a joint that was never really there. We work across Oakville, Mississauga, Vaughan and the rest of our service area, insured and WSIB covered, with 25+ years of walls in our project portfolio and 4.3 stars from 12 Google reviews.