Every second renovation call I get starts the same way: stucco on an addition, and can we match the existing wall. It is the right question asked about the wrong half of the job. Matching a finish is a craft problem, and I have written about that one already. Whether your addition ends up reading as part of the house or as something bolted onto the back of it gets decided months earlier, by the framer, over about ten minutes of measuring that nobody asks him to do.
I have been plastering in the GTA for over twenty-five years, and additions are where I see the most expensive avoidable mistakes on residential work. Not because anybody is careless — because the decisions that matter most to my trade get made early, by other trades, with nobody in the room who has to live with the wall afterwards.
Can you match stucco on a new addition?
Close, rarely invisible — and matching is not your main problem. Two things decide whether an addition disappears into the house: whether the new wall lands in the same plane as the old one, which is a framing call, and whether the junction between them has a proper movement joint. Get those two right and the finish becomes manageable.
The cosmetic side I will keep short here, because it already has its own article. A wall that has faced Ontario weather for fifteen years is not the colour it was mixed as, and a fresh panel beside it will read newer in low afternoon light no matter how good the trowel hand is. The honest options and the tests for judging a match are set out in why stucco repairs show and how to break the finish at a line. Everything below is about the half of the job that cannot be fixed with a better finish coat.
The measurement your framer needs before he builds the wall
Here is the one that costs people real money. Your framer will normally build the addition so the new sheathing lines up with the old sheathing, because that is what flush means to a carpenter. But the old wall is not sheathing on the outside — it is sheathing plus everything my trade put on top of it, years ago. Line up the sheathing and you guarantee the finished faces do not line up.
Traditional three-coat stucco is nominally seven-eighths of an inch of render, and it is sitting on lath and building paper. Frame flush to the old sheathing and your new finished wall lands roughly an inch shy of the old one, all the way down a junction that might be eighteen feet tall. In flat light nobody notices. In raking evening sun, which is exactly when people look at their house from the driveway, you see a shadow line the full height of the wall for the rest of the time you own it.
On an EIFS house it stops being a shadow line and becomes a step you can put your hand around. Fifty to a hundred millimetres of foam, plus the finish over it, puts the old face two to four inches proud of a flush-framed addition.
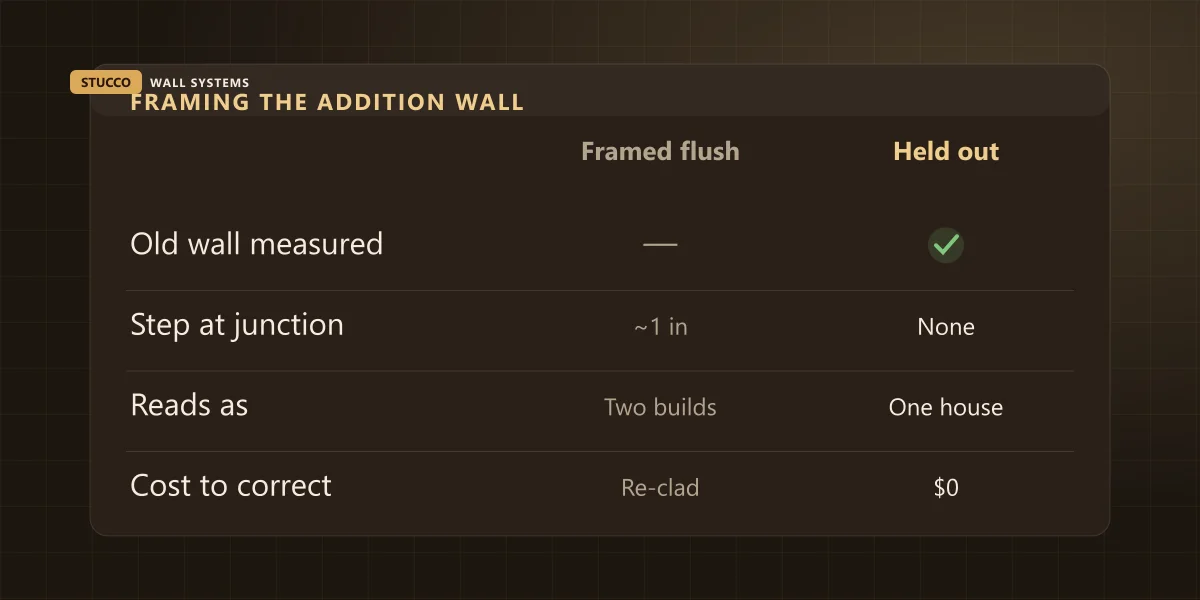
The fix costs nothing, and it has to happen before the wall goes up. Somebody cuts a small probe at an existing outside corner, measures from the face of the old sheathing to the face of the old finish, and the framer holds the new wall out by that number. Ten minutes with a utility knife and a tape. After the addition is framed, sheathed and roofed, the same correction means furring the entire new wall out or living with the step.
| What is on the old wall | How far it stands off the sheathing | What the framer has to do |
|---|
| Traditional three-coat over paper and lath | About 7/8 in of render, plus the lath and paper behind it — call it an inch | Hold the new wall out roughly an inch |
| A thinner two-coat or one-coat system | Closer to half an inch all in | Hold it out half an inch — but measure, do not assume |
| EIFS | 50 to 100 mm of foam plus the finish, so two to four inches | Frame to the measurement or the junction becomes a step, not a seam |
| Render applied direct to block or brick | Little build-out beyond the render itself | Watch the substrate change instead — the wall type is switching, not just the thickness |
One honest caveat: if the plan is to refinish that whole elevation anyway, this stops mattering, because both walls end up under one new finish. That is a decision worth making before framing rather than after, which is the whole point of this article.
Why the junction cracks, and what belongs in it
An addition is a second building leaning on your first one. Its foundation was poured this year and has not finished settling. Its framing lumber is still giving up moisture and will shrink through its first heating season. The original house did all of that thirty years ago and is finished moving. Those two structures will not move together, ever.
So when a crew runs the lath and mesh straight across the junction, what they have actually done is tie two independently moving buildings together with a skin of cement about as thick as a pencil. It cracks. The only open question is which winter. I have opened up those cracks in Erin Mills and Kleinburg and found nothing wrong with the workmanship at all — good mesh, good base coat, laps done properly, all of it fighting a load it was never going to win.
What belongs on that line is an expansion joint, and it is not the same thing as the control joints already on your wall. A control joint divides one continuous wall into panels and handles that wall's own shrinkage and thermal movement; I have gone through what those lines on your wall actually do in the article on control joints. An expansion joint sits where two structures meet and is built in two pieces so the halves can slide past each other as the buildings move independently. The reinforcement stops on each side of it. Nothing bridges it but sealant, and that sealant is a wear item you will re-do once or twice in the life of the wall.
Two related details, both of which live at that same junction and both of which have their own articles, so I will just flag them. If the addition's roof runs into the old wall, that is a headwall condition and the metal goes in before any stucco does — see where roof meets wall. And if new deck framing or a new grade lands at the bottom of that junction, the base of the wall still needs its clearance, no matter what the landscaper has planned.
The layer nobody sees: tying the new barrier into the old
Stucco is not what keeps water out of your house. The water-resistive barrier behind it is, and the render is the sacrificial coat that takes the weather. On an addition you are joining a brand new barrier to an old one that is buried under an inch of cement and cannot be inspected until somebody cuts.
Done properly, we cut the existing stucco back at the junction — a strip wide enough to work in, not a hairline — until the old building paper is exposed and sound. The new sheet then goes behind the old one: you slit the existing paper, slide the new membrane underneath it, and seal the cut. Water running down the old wall then arrives on the outside of the new barrier instead of behind it. Lap it the other way, which is quicker and looks identical once the finish is on, and you have built a funnel into the addition's framing.
The catch is that nobody can tell you in advance what is back there. GTA housing stock covers a lot of decades and a lot of practices.
| What we find when the old wall is cut back | What it means | What it does to the job |
|---|
| Two layers of building paper, still sound | The normal, good case | Tie in and carry on — no change to the price |
| Paper present but brittle or torn at the seam | Age, or an old repair done without one | Cut back further and patch in new membrane — a small add, settled on the spot |
| No barrier at all, render straight onto masonry | Common on older solid-wall construction | There is nothing to lap into; the new barrier terminates and gets sealed to the masonry, and I want that in writing |
| Sheathing dark, soft or crumbling at the junction | You had a leak before the addition was ever drawn | Stop. This is repair work, not addition work, and it is priced as such |
That last row is the one that turns a phone call into a difficult conversation, so I would rather have it here than on a ladder. Rotten sheathing found at a junction is the same work as any other water repair on this site: a contained area is our $450 to $1,200 patch band, and once the damage runs behind a whole section of wall it moves into the $1,500 to $5,000 range covered under stucco repair. It is genuinely not an upsell. It is a wall that was already wet before your architect drew anything.
Where should the new finish stop?
Three honest options, and the money between them is smaller than people expect on a project this size.
Stop at an inside corner. The addition gets new stucco, the old walls are left alone, and the change happens on a line the eye already accepts as a break. This is the cheapest and it works well when the addition sits at the back and the two finishes are never seen in the same glance.
Refinish the whole affected elevation. New stucco on the addition, and a new finish coat carried across the existing wall it runs into, so there is no comparison to make. This is what I recommend whenever the junction is visible from the street or the driveway.
Refinish the house. Worth pricing if the existing finish is at the end of its life anyway, because the crew, the scaffold and the mobilisation are already on site and that is a real part of any stucco bill.
Run it on a common shape. A two-storey rear addition sixteen feet deep by twenty wide gives about fifty-two linear feet of new exterior wall; at roughly eighteen feet to the eave that is a bit over nine hundred square feet gross, and after windows and doors call it 780 square feet of actual stucco. At our published residential range of $8 to $16 per square foot installed that is $6,240 to $12,480 for the addition itself.
The side elevation it lands on is another 520 square feet. Refinishing that is a different scope — there is no lath to hang and no base coat to build, just preparation and a new finish over a sound existing wall — so it prices at the lower end of that same range rather than the middle. Call it $4,160 to $6,240 for the old wall.
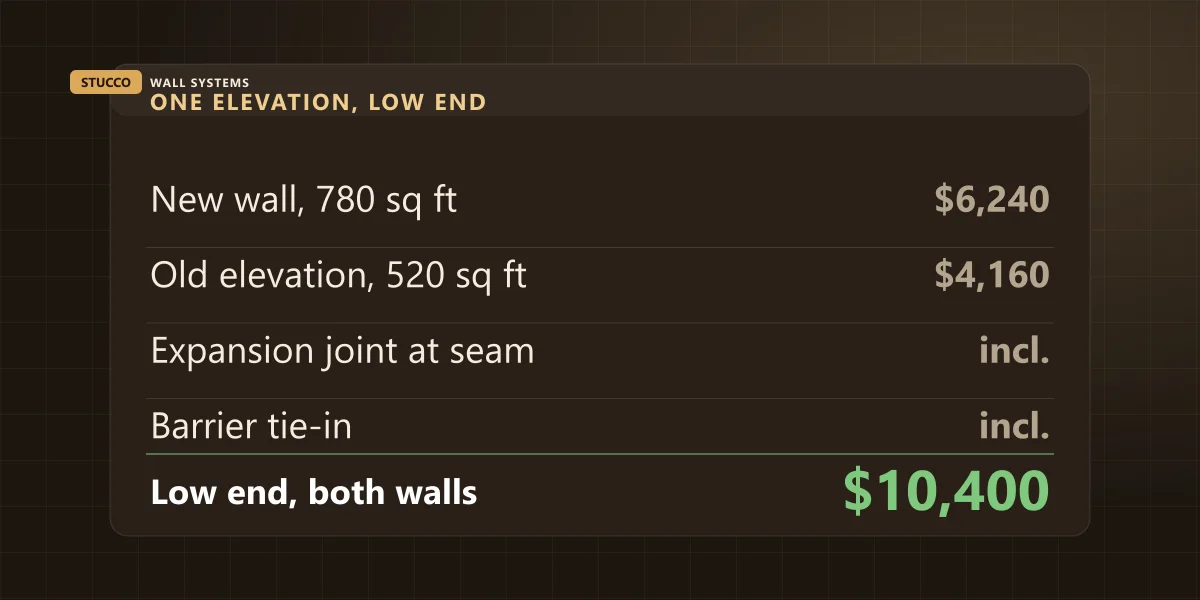
Those are illustration numbers on a made-up but ordinary shape, not a quote for your house — every wall gets measured before I put a figure on it. But the shape of the answer holds: on an addition project running well into six figures, the difference between the junction reading as a seam and reading as a mistake is a few thousand dollars, decided at the same table where somebody is choosing tile.
When does the stucco actually go on?
Late, and later than most people plan for. Stucco is one of the last exterior trades on an addition: framing and sheathing inspected, windows in, roof on and roof-to-wall metal installed, then barrier, lath, base coat, a cure window, and finish. Every one of those has to be finished before I can start, and two of them belong to the City.
That inspection sequence is not a formality you can work around by starting early. Toronto Building runs mandatory inspections at set stages of construction, and the City is blunt about the tail end of it too: “Property owners are required to schedule a final inspection upon completion of their project to close the permit”, and “open permits may impede future real estate transactions”. That is straight from the City's own building inspections page. An addition that gets covered in finish before the inspector has seen what is underneath is a problem for the person selling the house, not for the crew that has gone home.
| Stage | What has to be true before it | Who is holding it up when it slips |
|---|
| Framing and sheathing signed off | Inspection booked and passed | The GC — and the inspection calendar |
| Windows and doors installed | Openings framed to the right size | The supplier — window lead times move addition dates more than anything else |
| Roof on, roof-to-wall metal in | The roofer knows the wall is getting stucco | Nobody, until it is missed and the metal has to go back on |
| Barrier and lath | The old wall cut back and the barrier tie-in agreed | Us — but only after everything above is done |
| Base coat, cure, finish | Several days above freezing in the forecast | The weather, and it does not negotiate |
That last row is the one that decides your calendar. The base coat wants time and temperature, and a GTA November does not reliably supply either; I set out the month-by-month reality in the best time of year for stucco work. An addition that closes in late usually winters in housewrap and gets its stucco in spring. That is survivable — housewrap is a water-resistive barrier and it is doing its job — but it is a fact worth knowing before the framing date is set rather than after.
Four sentences to put in the addition contract
Additions are run by a general contractor, and everything above sits in the gap between the framer, the roofer, the window installer and me. Nobody is hiding anything — no single trade's scope naturally contains it. These four lines close the gap and cost nothing to add.
| Put this in the contract | What it prevents |
|---|
| The addition framing is to be held out from the existing sheathing by the measured thickness of the existing cladding. | A shadow line or a step down the full height of the junction, uncorrectable once framed |
| A two-piece expansion joint is to be installed at the junction of new and existing construction. | A crack on that line within the first year or two, then again after every repair |
| The existing stucco is to be cut back at the junction and the new water barrier lapped behind the existing barrier. | A barrier detail that looks perfect and drains into the new framing |
| Extent of refinishing on the existing elevation to be agreed in writing before framing starts. | The argument at the end about who expected the old wall to be redone |
The short version
Matching the finish is the last problem on an addition, not the first. The plane of the wall is set by the framer, the junction needs an expansion joint rather than a lapped mesh, the new barrier goes behind the old one, and the extent of refinishing on the existing elevation is a decision to make before framing rather than an argument at the end. All four are cheap or free at the right moment and expensive at the wrong one.
We do the stucco on additions and second-storey builds across the GTA, from Toronto out through Mississauga, Oakville and Vaughan, and the scope for a whole-house or whole-elevation finish is set out under residential stucco; there are finished walls in the project gallery if you want to see how a junction should look. If an addition is being drawn or framed on your house this season, send us the address and a photo of the wall or call (905) 973-6470 before the framer builds that wall, not after. Ten minutes now is worth a lot more than an inch of furring later.