Nobody calls a plasterer about a heat pump. They call the HVAC company, book the install, and find out afterwards that the machine had opinions about their stucco. An outdoor unit gets bolted down a couple of feet from a wall somebody finished, a refrigerant line set goes straight through that wall, and from November to March the thing sheds meltwater at the base of it. None of that appears in the HVAC quote and none of it appears in mine. That gap between two trades is exactly where it goes wrong, and it is cheap to close on the front end. Here is the wall side of the job, from the trowel end.
What does a heat pump change about a stucco wall?
Three things. A hole through the drainage plane for the line set. A heavy machine that vibrates, standing a foot off the wall or bolted to it. And meltwater dumped at the base of that wall every defrost cycle, all winter. None of the three is hard to detail. All three get missed, because each belongs to the other guy.
Nobody is being careless here. The HVAC installer is being paid to make a system work and to leave the building weathertight enough to pass, and by their standards a foamed hole does that. The plasterer is being paid for the wall and shows up at a different time of year. What is missing is the sentence in the middle where somebody says what the hole has to look like. I have never once had that argument on a job where the two dates were talked about in advance, and I have had it plenty of times where they were not.
Why does the outdoor unit's position matter so much?
Because where the unit sits decides where its water goes. An air-source heat pump running in heating mode builds frost on the outdoor coil and clears it with periodic defrost cycles, and that meltwater has to land somewhere. Put the unit tight to a wall and "somewhere" is the bottom of your stucco, through every freeze-thaw swing we get.
That matters more here than it would on brick or vinyl. The bottom of a stucco wall is a termination, not just more wall: the finish stops at a weep screed or a starter track, and that edge is the assembly's designed drainage point. It is meant to shed the occasional rain splash and then dry. It is not meant to be rained on locally by a machine, in January, when nothing dries. This is the same zone I wrote about in keeping the weep screed clear, arriving from a completely different direction.
The fix costs nothing at install time and everything afterwards: get the unit up on a riser with drainage under it, and get it far enough off the wall that the splash falls on gravel instead of plaster. Cold-climate installs already want the unit above the snow line for its own sake, so you are usually asking for something the installer was inclined to do anyway. Natural Resources Canada's homeowner guide to heat pumps is the plain-language background if the equipment side is new to you.
| Where the unit ends up | What it does to the wall | My call |
|---|
| On a riser, well off the wall, gravel and drainage below | Meltwater falls clear of the termination and drains away | Best, and free if you ask before install day |
| On a low pad tight to the wall | Defrost water and splash hit the weep screed every thaw | Fixable cheaply now, expensive in five winters |
| Bracketed to the wall itself | Water still lands at the base, plus vibration and fasteners through the finish | Only where there is genuinely no ground |
| On the lawn, with grade built up around the pad | Raises grade against the wall — the clearance problem, with a machine on top | No. Move the unit, not the dirt |
Can you hang the outdoor unit off a stucco wall?
Sometimes, and only into structure. A bracket has to reach framing or solid block behind the finish — never the finish itself, and never plastic anchors set in a coating. On EIFS you cannot hang anything meaningful off the foam at all. An outdoor unit is roughly a hundred pounds and up, and unlike a light fixture it runs.
That last word is the part people underestimate. A compressor is a vibrating load, and vibration is what kills sealant joints. Four fasteners through a finish coat, each one working a few thousandths back and forth for years, will open the sealant around themselves long before the wall around them shows anything. I have taken brackets off walls where the finish was perfect and all four holes behind the plate were wet.
If the bracket genuinely has to go on the wall — a Port Credit semi with a side yard you can barely walk down, a Kingsway house where the only clear ground is the neighbour's — then it gets treated as a structural penetration, not a mounting job: located to framing, drilled oversize through the finish and foam, sealed down at the sheathing, and ideally landed on a mounting block rather than the face of the wall. That whole method is laid out in the post on mounting things on stucco without leaks. On a re-clad we build those blocks in before the finish coat, which takes minutes then and is a repair later.
Where does the line set go through, and who drills it?
Through the wall, usually low and usually by the HVAC installer on install day. That is fine when the hole falls slightly to the outside, runs oversize through a sleeve, is sealed against the sheathing rather than the surface, and finishes under a hood. It is not fine bored dead level and filled with expanding foam.
That second one is what I find most often, and a dead-level hole through a wall is a straw. Water does not need pressure to use it, only a wind off the lake and somewhere to go. Expanding foam is an air seal and an insulator, not a weather seal — it is not UV stable, it does not bond reliably to an acrylic finish, and once it has shrunk a season you have an open annular gap hidden behind a tidy-looking plug. The hood matters for the same reason a drip edge does: it throws water off the top of the penetration instead of letting it track down the line set and into the hole.
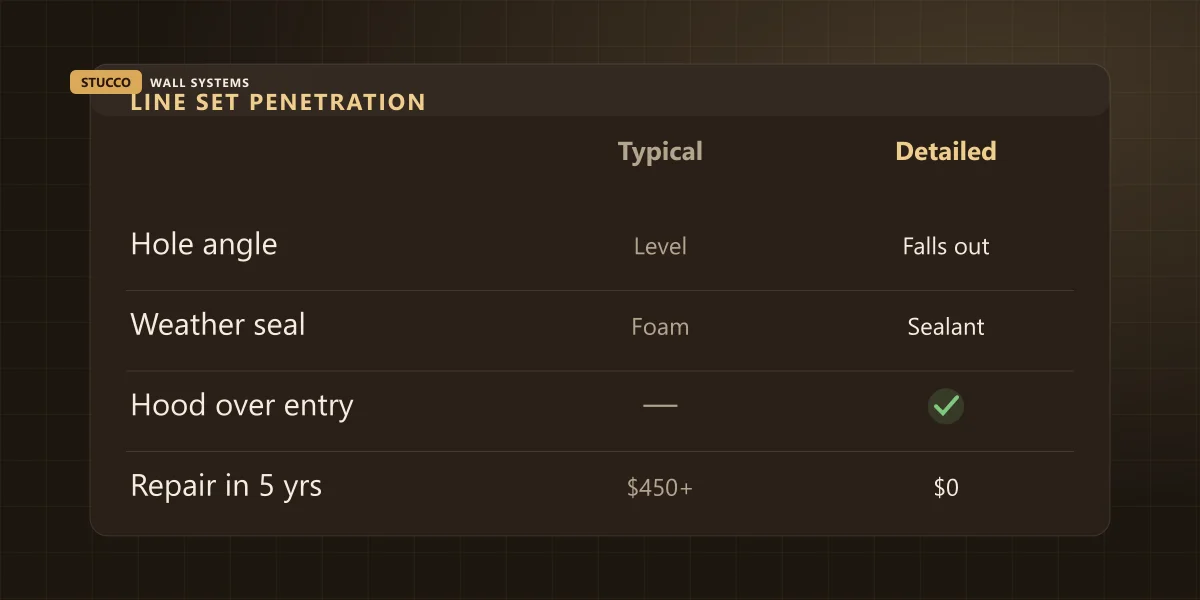
| What the hole gets | What usually happens on the day | What it should be |
|---|
| Angle | Bored dead level through the wall | A slight fall to the outside so water runs out |
| Size | Drilled tight to the line set | Oversize, so a sleeve seals it and the finish carries nothing |
| Weather seal | Expanding foam trimmed flush at the face | Sealant down at the sheathing, over backer rod where the gap is wide |
| Cover | Nothing, or the plastic clip in the box | A hood or escutcheon that sheds water off its top edge |
| Location | Wherever the indoor unit landed | Clear of a control joint, above the grade clearance, reachable later |
What do five winters of defrost water do to the bottom of a wall?
They keep it wet through the part of the year when it cannot dry. Stucco handles wetting and drying cycles for decades; what it does not handle is one narrow band that never completes the drying half. The damage shows up in a predictable order, and the earlier you catch it the cheaper the row you land on.
| What you see at the base of the wall | What it usually means | Where it lands |
|---|
| A dark band under the unit that never dries all winter | The finish is staying saturated at the termination | Watch it, and move the water |
| Chalky white bloom on the finish below the unit | Salts travelling out of the wall with the water | $120–$400 to clean and reseal locally |
| Fine map cracking low on the wall, in that band only | Freeze-thaw working on a wall that never gets to dry out | $450–$1,200 |
| Finish soft to a thumb, or hollow to a knuckle tap | The water is in the substrate now, not on it | $1,500–$5,000 |
The white bloom is worth a word, because it panics people and usually should not. It is normally efflorescence rather than mould, and I go through telling them apart in the post on white stains on stucco. What makes it meaningful here is not the stain, it is the location: a bloom in a neat band under a heat pump is the wall telling you where the water is coming from. It is a diagnosis, not a cosmetic problem, and it is the cheapest row on that table to act on.
If I'm re-cladding, does the heat pump go first?
Yes, or at least the decision does. If the equipment is going in within the year, do it before the stucco. If that is impossible, tell me where it is going and what the line set needs. The wall is only open once. What costs twenty minutes while the scaffold is up costs a call-out and a patch afterwards.

Here is the arithmetic, plainly. A residential re-clad runs $8–$16 per square foot installed, and a penetration detailed inside that scope is not a line item — it is twenty minutes of a day I am already being paid for, with the blocking built in, the sleeve set before the base coat, and the finish worked around a hood instead of patched to it. The same penetration cut into a finished wall next spring is a minimum call-out at $120–$400, plus the risk that nobody talks about: a repair on a wall that is a year into curing has to match texture, aggregate, colour and sheen, and that is a genuinely hard target. The full version of that problem is in why a stucco patch shows.
The same logic runs the other way. If your heat pump is already in and you are re-cladding around it, say so at quoting stage. It changes where I want the control joints, whether the line set gets pulled and re-run or worked around, and whether that bracket ends up landing on new blocking or on the same four tired holes.
What does the stucco side of this actually cost?
Small money if it is planned and real money if it is not. I do not quote heat pumps; your equipment price is your HVAC contractor's number. What I can price is the wall: detailing one penetration during work already underway, repairing one that has been leaking, or rebuilding the bottom of a wall that spent five winters wet.
Planned into a re-clad, the penetration and the blocking disappear into the $8–$16 per square foot. As a stand-alone visit to detail or re-detail a penetration on a finished wall, expect the $120–$400 range. Localized repair where water has already got past the finish sits around $450–$1,200. Once it is into the substrate at the base of the wall it becomes $1,500–$5,000, and at that point you are not paying for a hole, you are paying for five winters of one. Our published ranges for the rest of it are on the stucco repair service page.
What to put in writing before the crew arrives
You do not need to supervise an HVAC install. You need four sentences in the quote or the email thread confirming it, and they cost nothing to ask for.
- Where the unit sits. On a riser with drainage below, clear of the wall on the coil side by at least the clearance in the manufacturer's manual — and further if there is room. Not on a pad tight to the plaster, and not with grade built up around it afterwards.
- How the wall gets penetrated. Sleeved, oversize, falling to the outside, sealed at the sheathing with a commercial-grade sealant, and finished with a hood over the entry. Expanding foam alone is not a weather seal.
- Nothing structural hangs on the finish. Any bracket reaches framing or solid blocking. On an EIFS wall that is not negotiable, because the foam holds nothing.
- Who makes good. If the finish is cut, chipped or stained, name who repairs it and to what standard. This is the sentence that is never in there, and it is the one that decides who pays.
Two more things worth knowing while you are at it. If part of your reason for the heat pump is the energy bill, an insulated wall and a heat pump pull in the same direction — the reasoning is in what continuous exterior insulation does to a heating bill. And if you start running a heat pump and suddenly see damp patches high on interior walls, that is a different animal entirely; I wrote about the water that comes from inside the house because every winter somebody blames the stucco for it.
Where to start
If the heat pump is booked and the stucco is fine, send me a photo of where the unit is going before install day — that is a two-minute answer and it is free. If the unit went in a while ago and there is a dark band or a chalky bloom under it, that is worth a look this season rather than next, because every row further down that table costs multiples of the one above it.
Twenty-five years on the tools across the GTA, 4.3 stars from 12 Google reviews, and a strong preference for detailing a hole once instead of chasing it later. You can see finished walls from Erin Mills to Kleinburg in our project gallery, and what we hold ourselves to on a full house is set out under residential stucco. If you are in Mississauga, Toronto, Oakville or Vaughan and there is a heat pump in your near future, send us the address and a photo of the wall or call (905) 973-6470 — ideally while the answer can still change something.