People ask me what stucco style suits their house, and they usually mean colour and texture. The bigger half of that answer comes earlier. Stucco styles across GTA neighbourhoods track almost exactly with when the neighbourhood went up, because a wall built in 1925 and a wall built in 1995 are different objects. Twenty-five years of walls between Cabbagetown and Kleinburg, and I still open every assessment with the same question: how old is the house?
Why does the neighbourhood change the stucco answer?
Because the GTA was built in waves, and every wave used a different wall. Pre-war Toronto is solid masonry with no stud cavity. Post-war suburbs are wood frame behind a brick skin. The subdivisions of the eighties and nineties were the region’s first stucco boom. New estate builds are drawn for exterior foam from the start.
None of that is a coincidence of geography. A GTA neighbourhood normally went up inside a tight window: a developer bought land, put up a few hundred houses over a handful of years, and moved on. So the address gives me the decade, the decade gives me the wall assembly, and the assembly decides which systems are honest options. Quoting a re-clad in Mississauga and a repair in old Toronto in the same week means doing two different trades under one name.
| Where you are | Typical build era | What is behind the finish | What usually fits |
|---|
| Cabbagetown, Riverdale, Roncesvalles | Pre-1930s | Solid brick, two or three layers thick, no stud cavity | Cement work and repair — not exterior foam |
| The Kingsway, older Etobicoke | 1920s–30s | Solid masonry, often with original stucco and half-timber | Traditional cement, matched to the existing texture |
| Post-war Etobicoke and North York | 1950s–70s | Wood frame with a brick veneer skin and a cavity behind it | Stucco in patches — gables, porches, additions |
| Erin Mills, Meadowvale, Richmond Hill | 1980s–90s | Frame and sheathing, often the first generation of stucco or EIFS | A full EIFS re-clad, with the insulation included |
| Kleinburg, Vaughan, north Oakville | 2000s onward | A wall drawn around continuous exterior insulation | Drained EIFS with architectural detailing |
Pre-war Toronto: why a solid wall does not want foam on it
A double-brick wall from the 1920s has no stud cavity and no modern weather barrier. It deals with water by absorbing it and drying out again, through both of its faces. Wrap it in foam and acrylic and one of those directions is gone, so the moisture that used to leave through the outside face has to find somewhere else to go.
That is not my opinion about old houses. Natural Resources Canada describes what is inside them: “Many solid walls, including double brick and wood plank walls, have a small cavity, generally less than 25 mm (1 in.), which is a drainage plane that collects and drains water out of the wall.” And then, about that cavity: “Never insulate these cavities or plug their drain holes.” It is in Section 7 of Keeping the Heat In. A one-inch gap does not sound like much until you know it is how water gets back out of that wall.
So on a century home in Riverdale, Roncesvalles or Cabbagetown, the answer is usually traditional cement work: repair what is there, rebuild the failed areas on the original substrate, and let the wall keep working the way it was built to. I laid the two systems side by side in EIFS versus traditional stucco; on solid masonry there is far less to weigh up, because the foam option mostly comes off the table.
There is a paperwork layer on these streets too. Parts of Cabbagetown, Riverdale and other old Toronto neighbourhoods sit inside designated Heritage Conservation Districts, where altering the street-facing exterior needs a heritage permit on top of any building permit — and a change of cladding material is exactly the sort of alteration that gets looked at. Where that line sits is in stucco and building permits in Ontario.
The Kingsway is the exception in this group. Many of those 1920s and 30s Tudor Revival houses were stucco from the day they were finished, so nobody there is deciding whether to have stucco. The job is matching a ninety-year-old sand or float texture well enough that the patch disappears — the finish textures compared covers how forgiving each one is to patch.
| On the same street | Pre-war solid wall | 1990s framed wall |
|---|
| Wall behind the finish | Solid brick right through | Studs, sheathing and a brick or stucco skin |
| Drainage cavity | Under an inch, and it must stay open | A full cavity built into the assembly |
| Exterior foam over it | No — it closes a drying path | Yes — the wall is designed for it |
| System that fits | Traditional cement, repaired in kind | EIFS re-clad, insulation included |
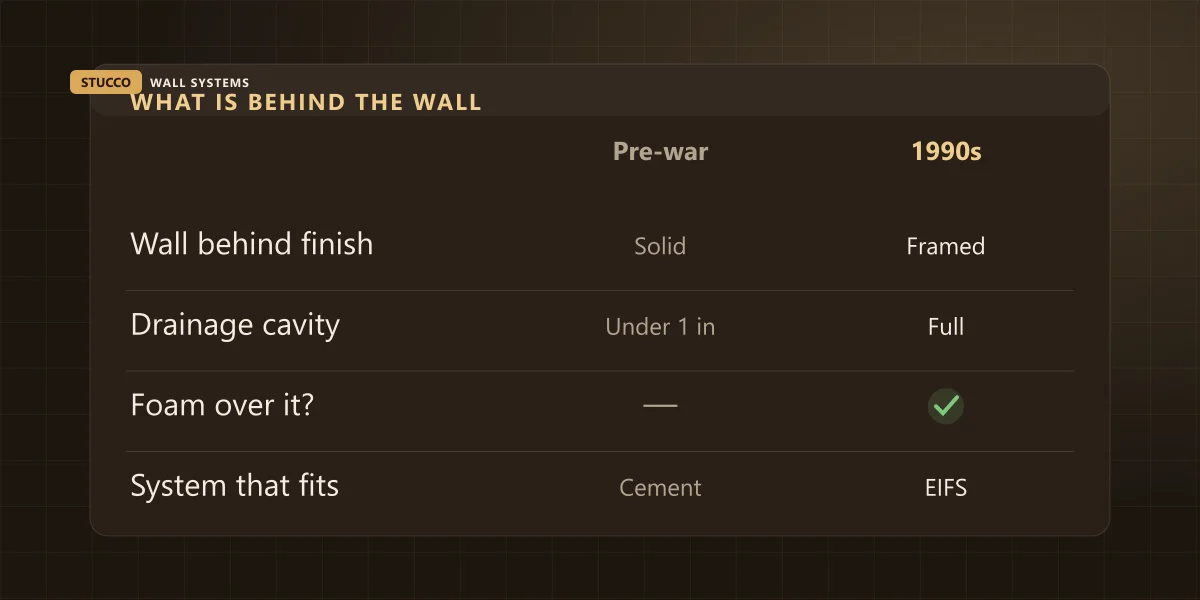
Post-war Etobicoke and North York: stucco turns up in patches
On a 1950s or 60s bungalow or backsplit the walls are wood frame with a brick veneer skin and a cavity behind it, and stucco is rarely the whole house. It shows up on gable ends, porch ceilings, garage walls and later additions. Most of my work on those streets is matching an existing patch, not cladding a house.
Small areas price oddly, and it catches people out. A gable takes the same setup, mixing, texture trials and travel as a much bigger wall, so the cost per square foot reads high while the total stays modest. Booking every patch on the house into one visit is the only real lever on that, and the same logic runs through stucco crack repair costs in the GTA.
These houses carry the same drainage detail in a different form. Along the bottom course of brick, and often just above windows, sit small open joints — weep holes — that drain the cavity behind the veneer. Rendering across the base of a wall and closing them off is the same mistake Natural Resources Canada warns about in older walls. Below the brick, the exposed foundation is usually parged, a different material doing a different job; I separated the two in parging versus stucco.
The 1980s and 90s subdivisions: where most of my re-clads are
Erin Mills, Meadowvale and their equivalents across Richmond Hill and Vaughan got the region’s first big wave of stucco and EIFS. Those walls are now thirty to forty years old, and plenty of them are barrier systems with no drainage path behind the finish. They are the single most common full re-clad I quote.
What matters on these houses is whether the original system was built to drain. A barrier system depends on the outer skin never letting water past, which holds until the first sealant joint or corner crack gives up. A drained system assumes water gets in and gives it a route out. How the industry got that wrong and then fixed it is in why EIFS got a bad name in the 90s; the symptoms on your own wall are in the six signs water is behind your stucco.
The arithmetic on this vintage works out better than most. A residential re-clad at $8–$16 per square foot installed replaces a tired thirty-year-old finish, adds insulation the house never had, and puts a drainage plane behind the new system in one job. It is why so much of what we do in Mississauga sits on streets built inside one narrow stretch of years.
Kleinburg, Vaughan and the new custom builds
On a new estate build the wall is designed around continuous exterior insulation before anybody breaks ground. EIFS arrives on the drawings rather than as an upgrade, so the conversation skips past system choice entirely and goes to detailing: reveals, banding, returns, and how flat the finished plane has to be across a three-storey elevation.
That is where the price separates. Standard EIFS work sits around $18–$28 per square foot; architectural-grade work on a custom home runs $30–$40, and the difference is almost entirely flatness tolerance, mock-up panels and a reveal layout coordinated against the drawings instead of decided on the wall. I took those apart one at a time in the stucco details that make custom homes look custom, and the same thinking belongs on a new build from the first elevations.
Colour behaves differently on this vintage too. Deep charcoals with black trim are the default look on Vaughan and Kleinburg customs right now, and they show dust, pollen and water spotting fastest on a large sun-facing wall, so they need washing more often than a warm neutral does. Worth knowing before you sign; choosing stucco colours for GTA homes goes through how each family ages. The finished version is on our Vaughan acrylic stucco project.
Does living near the lake change anything?
Yes, and it changes the maintenance calendar more than it changes the system. A wall in Port Credit or Bronte facing open water takes more wind-driven rain and more unshaded sun than the same wall two streets inland, so sealant joints and paint film wear out at the front of their range rather than the back of it.
Exposure is a second axis running across the era question rather than replacing it. Two identical 1990s houses, one inland and one facing the water, need the same system on different service intervals. And it is usually one or two elevations carrying it: the side facing the lake, and the south or west walls taking full afternoon sun.
| On the same house | Sheltered elevation | Lake-facing elevation |
|---|
| Sealant joints at openings | Toward the ten-year end of their life | Toward the five-year end |
| Painted cement finish | Repaint around 10–12 years | Repaint around 8–10 years |
| Algae on shaded walls | An occasional wash | More often, especially on north walls |
| What I check first on an assessment | Cracks and control joints | Head flashing and window perimeters |
The same shortened intervals apply to a commercial facade on those lakeshore main streets.
How do I tell which wall I actually have?
Four checks, none of which need a ladder. Find the real build year rather than trusting how the house looks, read the brick pattern for header courses, look for weep holes along the bottom course, and find out whether your street sits inside a heritage district. Those four answers shape most of the quote.

Check the build year, not the look. A 1925 house re-clad in 1990 still has a 1925 wall behind whatever is on it now, and renovation work often hides the era completely. Your property tax assessment, the land registry or the original permit gives you the year. Everything else on this page follows from it.
Look for header bricks in the pattern. Where brick is still exposed, look at how it is laid. If every few courses you see a row of short square ends instead of long faces, those are headers — bricks turned end-on to tie two layers of masonry together, which means a solid wall. A veneer wall over frame is all long faces, tied back with metal you cannot see. Not every solid wall shows them, but when you see them you have your answer.
Find the weep holes at the base. Small open vertical joints along the bottom course of brick mean there is a drainage cavity behind it and the wall was built to shed water outward. If somebody has filled them with mortar, sealant or a skim of render, raise that with whoever you call, whatever else you decide about the finish.
Ask if your street is a heritage district. One search of the city’s heritage register settles it, and it costs nothing. Inside a designated district, the exterior work you are planning may need a heritage permit before anything else happens, and it can rule out a foam system entirely. Outside one, none of it applies.
What does each of these cost?
Repair work on an older masonry wall usually lands between $450 and $2,500 all in. A full re-clad on a subdivision house runs $8 to $16 per square foot installed. Architectural work on a custom build sits higher because of the detailing rather than the material. Wet framing behind any of them changes the number completely.
| Your house | Typical scope | What it costs |
|---|
| Pre-war masonry, wall sound behind it | Crack repair and texture match, in cement | $120–$400 per crack |
| Older wall, finish tired all over | Refinish the existing surface | $9–$16 per sq ft |
| Post-war patch on a gable or porch | Small area cut back, rebuilt and matched | $18–$34 per sq ft |
| 1980s–90s subdivision re-clad | Full EIFS, insulation and drainage included | $8–$16 per sq ft installed |
| Custom build, architectural detailing | Reveals, banding, flatness tolerance | $30–$40 per sq ft |
| Wet framing found behind any of it | Strip to substrate, dry, re-flash, rebuild | $1,500–$5,000+ |
The full line-item schedule sits on our stucco repair page if you want to price your own list first. What I would resist is letting the price pick the system. If a quote puts foam on a solid pre-war wall because foam is what that crew installs, you are paying today’s lower number and buying a moisture problem for five or ten years out — the whole argument in why the cheapest stucco quote costs the most.
The honest bottom line
People ask the style question and the system question in the same breath, and they have two different answers. What suits your street visually comes down to texture and colour on most GTA houses. What suits the wall was decided by the builder who put it up, decades before you bought the place, and no finish applied to the outside changes it.
To find out which of these your house is, send me the address and a few photos from the sidewalk — one straight on at the elevation, one close on the brick or existing finish, one at the base of the wall. I can usually name the decade and the assembly from that. The assessment is free and written either way. We work across Oakville, Etobicoke, Vaughan and the rest of our service area, fully insured and WSIB covered, with 25+ years of finished walls in our project portfolio and a 4.3-star rating from 12 Google reviews you can read yourself.